In this guide, we’ll show you how to overclock a CPU. Overclocking is a great way to get your CPU to run beyond its rated stock speed, but it’s not always a simple process. In this guide, we will take you through all the theory you need to learn to get started on overclocking both Intel and AMD processors.
In the old days, overclocking meant a free and straightforward performance boost for anyone with the right knowledge and a decent CPU cooler. You increased the voltage and multiplier, and your CPU went faster. You can still do that, of course, but the introduction of single-core boosts at stock speed, and CPUs with many cores, have made overclocking a bit of a muddy swamp to navigate.
However, overclocking definitely remains a valuable, performance-boosting tool for unlocked processors that is fun, free and relatively easy to perform. A traditional manual overclock, where you set a specific multiplier or frequency and then input a CPU voltage, isn’t the only way to do it, though. In fact, in many situations a manual overclock can now result in lower performance than stock speed.
Thankfully, the likes of AMD and Intel have come up with ways to take advantage of higher boost frequencies over one or several cores, but still boost multi-threaded performance when most or all of your CPU cores are under load.
Overclocking has been a main focus of Custom PC since we launched in 2003, and we’ve been pushing the latest CPUs to their limits for nearly 20 years. We have a boatload of knowledge and experience in overclocking, and we know which methods work best.
Common overclocking terms
- Vcore: The CPU voltage.
- Multiplier: The figure multiplied by the CPU base clock that gives the CPU its final frequency.
- Base clock: The internal bus speed of the motherboard platform.
- Peak boost speed: The maximum frequency a CPU’s cores can reach at stock speed – usually just on one or two cores.
- Base frequency: The lowest guaranteed CPU core frequency, although it’s largely irrelevant.
- All-core boost: The highest frequency all a CPU’s cores can reach at the same time.
- P-core:
- Vdroop: A fall in CPU voltage when under load, which can potentially result in instability.
- Loadline calibration: Increases the CPU overclock voltage when the CPU is under load, in order to counteract vdroop.
- Manual overclock: Applying a voltage and frequency multiplier to a CPU’s cores manually, usually with all the cores running. However, it’s also possible to apply different speeds to different cores on some Intel platforms.
- EFI: Extensible firmware interface. The brain behind your motherboard, which provides a graphical interface for overclocking and other settings, such as fan speed and boot options. This is sometimes called a BIOS (basic input output system), which is what PC motherboards used to have instead of an EFI several years ago.
The rise of boosting
Overclocking is possible thanks to the way CPUs are manufactured. Not all processors are equal, even given the extraordinary microscopic precision with which they’re made. Some cores will be able to hit higher frequencies than others, and some will reach similar frequencies but with lower voltages. AMD and Intel use this situation to their advantage, selling the lesser-able parts as lower-end CPUs and ‘binning’ the more capable ones as more expensive CPUs that can hit higher frequencies.
Given that all these CPUs may have more headroom than their advertised frequencies, this raises the possibility of lower-end models being able to overclock to similar speeds as their more expensive siblings, albeit with higher voltages.
Meanwhile, those flagship products representing the cream of the crop could also have extra headroom. However, as the CPU war between AMD and Intel has heated up, both companies have strived to hit higher and higher peak frequencies out of the box, also known as boost frequencies.
This approach has really muddied the waters when it comes to overclocking, many modern CPUs’ boosting algorithms are intelligent enough to make the most of one or two best-performing cores, which can reach higher frequencies than the other cores. AMD has been so aggressive here that many of its latest CPUs can hit far higher frequencies on one or two cores than you can ever hope to achieve with a manual overclock across all cores.
The issue here is that the boosting technology – in AMD’s case, called Precision Boost – is disabled when you apply a manual overclock. As a result, while a manual overclock might achieve a higher speed across all cores than some CPUs achieve at stock speed, it may not be as fast as the peak boost frequency across smaller numbers of cores, which the CPU can manage on its own at its default settings.
The end result is that if your overclock reaches higher frequencies than the CPU can manage out of the box across all cores at the same time but not higher than its single-core peak, you’ll see more performance in multi-threaded workloads, but in lightly threaded loads, your CPU may actually perform worse.
It’s a tricky situation and there’s no right or wrong answer. The best overclock for you largely depends on what workloads you’ll be throwing at your PC, as well as your specific CPU’s capabilities. Sometimes it’s best to leave your CPU at stock speed, others should be overclocked if you’re main goal is improving multi-threaded performance. Meanwhile, some processors can still hit higher frequencies when all their cores are overclocked, going even higher than their peak boost frequency.
What is a manual overclock?
A manual overclock is far from pointless, and if you’re just getting into overclocking, or if you don’t have the many hours it takes to read up on all the dark arts and fine tuning, a simple set-and-forget manual overclock is absolutely where you should start. Even if your overclock sits a couple of hundred megahertz below the peak boost frequency your CPU can achieve, your overclock is still unlikely to result in much lower performance.
Peak stock boost frequencies often happen across just one or two cores, so the frequency will drop as soon as the CPU is loaded across more cores. Your manual overclock might actually be matching what your CPU can only reach across half the number of cores at stock speed, so while performance might suffer in very lightly threaded or single-threaded workloads, your manually overclocked CPU will be faster in other workloads.
While many CPUs are already pushed close to their limits in terms of all-core clock speeds, some of them can still be overclocked across all cores to the same level or even further than even their peak boost frequencies. There are some more complicated manual overclocks too, which allow you to still reach those high frequencies on one or two best-performing cores. Intel, for example, allows you to manually adjust each individual core yourself to a specific frequency, and even identifies the best-performing cores to get you started.
Meanwhile, AMD has various forms of its Precision Boost Overdrive feature, which you can tweak to provide higher all-core boosts as you would with a manual overclock. Unlike the latter, however, your CPU will still boost to its maximum boost frequencies in order to keep lightly threaded performance at peak levels. The latest version goes even further, enabling you to lower the voltage as much as possible too. We’ll take a look at all these methods later in this guide.
CPU boosting methods
Before you start overclocking, you need to have an idea about the frequencies your CPU reaches in different scenarios. This is important because you firstly need to work out which overclocking method is right for you and your CPU. In some cases, leaving your CPU at stock speed or tweaking its boosting algorithms might be the best option.
To start, there’s the all-core boost frequency – where a CPU will hit a certain frequency across all cores at the same time when you’re running a multi-threaded workload that uses all of them. The peak boost frequency is usually higher than the all-core boost frequency and will likely be limited to just one or two cores. This limits power consumption when all cores are loaded, keeping the CPU within a specific limit or thermal design power (TDP) wattage.
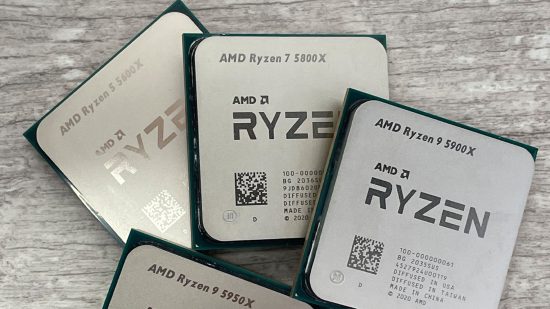
For example, the AMD Ryzen 9 5950X has 16 cores, and when all of them are loaded, it often draws slightly less power than the Ryzen 7 5800X with all of its eight cores under load. That’s because the 5800X will boost to much higher frequencies, while the Ryzen 9 5950X has to rein in the clock speeds when all its cores are loaded, in order to stay within certain power and thermal limits.
For this reason, the Ryzen 9 5950X usually responds well to manual overclocks – if you remove those limits and have good enough cooling, the rest of its cores are usually able to hit frequencies that go well beyond their usual limit.
The way the CPU gets to the all-core boost frequency, though, can differ wildly, even between models in the same range. Both AMD and Intel add certain boosting features to flagship products, so they can hit higher boost frequencies if your cooling and motherboard’s power delivery are sufficient.
What is Intel Turbo Boost?
For example, Intel’s basic boosting technology is called Turbo Boost 2, and it’s present on most of its CPUs, even at the extreme low end. It defines how fast a CPU’s cores can run whether just one is loaded, all the way to up to situations where all of them are loaded at the same time. For many CPUs, this figure will represent the limit of their frequencies.
Premium models now also include features such as Thermal Velocity Boost and Turbo Boost Max Technology 3, which add extra boosting headroom. The latter will allow one or two cores to hit higher frequencies than Turbo Boost 2, and these cores are the best-performing ones in a CPU. As we mentioned earlier, you can usually see these cores identified in the EFI with stars next to them, allowing you to manually tweak them too.
Thermal Velocity Boost works differently in that it can apply to all cores and is primarily dependent on CPU temperature, in this case around 70°C. If the CPU is below this temperature, 100MHz will be added to the Turbo Boost 2 frequency, increasing it across the core boosting spectrum.
As if that wasn’t enough, the Core i9-11900K introduced yet another feature called Adaptive Boost Technology. This allows all eight of its cores to hit the same 5.1GHz frequency that just two of its cores can reach in Turbo Boost 2, but only in certain conditions.
Without Adaptive Boost Technology, our Core i9-11900K sample would only reach 4.8GHz with seven and eight cores loaded, so this tech can result in a significant boost to performance of up to 5.1GHz. The fact it can hit 5.1GHz out of the box does mean a manual overclock is likely a waste of time on this CPU, though, unless you’re able to hit several hundred megahertz higher.
What is AMD Precision Boost?
AMD has a similar offering with Precision Boost 2, which has been working away under the hood of Zen-based CPUs since the launch of the Ryzen 2000 series of processors. However, unlike Intel’s advanced boosting technologies, Precision Boost 2 is available with all of AMD’s CPUs – not just its expensive flagships. AMD’s CPUs will clock higher if they’re cooler, and they can be further tweaked using its Overdrive tools, which we’ll examine later.
If you’re struggling to get to grips with all of the above, there’s also an easier way to work out where your CPU sits on the boosting scale. MSI Afterburner software can graph the frequency of all your CPU’s cores individually, allowing you to fire up your most-used games and software to see what frequencies they reach and across how many cores.
That way, you can see if your manual overclocking exploits will offer any gains. For example, if you find that your favorite game rarely uses more than two or three cores, and those cores are boosting at or close to your CPU’s peak boost frequency, you’ll need a manual overclock to hit close to this figure or you’ll potentially lose performance.
If your software is typically using five or more cores, then its frequency will likely be much lower than the one it reaches on one or two cores, providing a lower target for your manual overclock. Just remember that if you do decide to apply a manual overclock, the boosting features we’ve discussed from Intel and AMD above will be disabled, and your CPU will be limited to the frequencies and voltages you set.
Which Intel CPUs can you overclock?
The key to modern manual overclocking is your CPU’s multiplier. This multiplies a frequency called the base clock in order to achieve the desired CPU frequency. For example, a system bus of 100MHz and a multiplier of 50x will give a CPU frequency of 5000MHz or 5GHz. This is also how boosting works – by raising or lowering the multiplier, but with manual overclocking you’re taking control. However, not all CPUs allow you to adjust the multiplier manually, and others require specific motherboards to unlock the feature too.
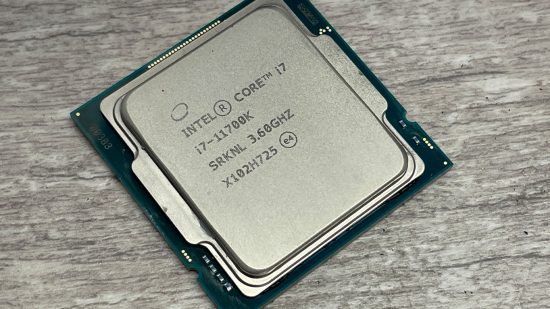
For example, Intel limits overclocking to K-series and KF-series CPUs on its mainstream desktop platform, but all its high-end desktop X-series models are overclockable. As long as the model number is followed by either of these suffixes, such as Core i5-13600K or Core i7-13700KF, then you can adjust the multiplier manually.
If there’s no K or KF (or X) then that CPU has a locked multiplier and it will only raise and lower the multiplier automatically according to its boosting technologies. This includes CPUs such as the Core i5-13400F. The ‘F’ here simply means that the CPU lacks integrated graphics and costs a bit less than the standard model as a result. You’d need a ‘K’ for it to be overclockable.
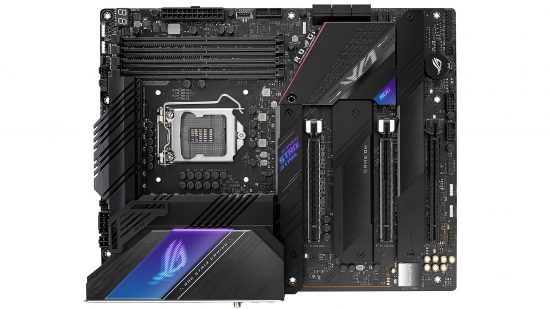
Intel also limits overclocking to specific motherboard chipsets. You’ll need a motherboard based on a Z-series or X-series chipset, such as Z590, Z790, or X299, for CPU multiplier overclocking.
Prior to Intel’s latest 500-series chipsets, any motherboards that didn’t have the flagship Z-series chipsets would also limit the memory speed to whatever is natively supported by the CPU.
For example, the Core i9-9900K will support memory frequencies up to 2666MHz in a motherboard without a Z-series chipset – even if you drop in a 3200Mz kit, you won’t be able to run it at that frequency unless you opt for a Z-series motherboard too.
This has changed with the new 500-series chipsets, with B560 and H560 onwards (including the latest B660 and B760 chipsets) supporting memory overclocking and allowing you to boost memory speeds higher than those natively supported by the CPU.
Which AMD CPUs can you overclock?
AMD considers itself overclocking-friendly, and rightly so, seeing as most of its Ryzen CPUs support overclocking and have unlocked multipliers. The only issue is that not all of them respond that well to manual overclocking, and many are already sailing quite close to the wind when it comes to their maximum frequencies.
As AMD has shrunk its manufacturing process from 14nm with the first Ryzen chips, to 5nm with the latest AMD Zen 4 CPUs, the voltages considered safe for overclocking have also lowered – we’ll go into more detail about this later.
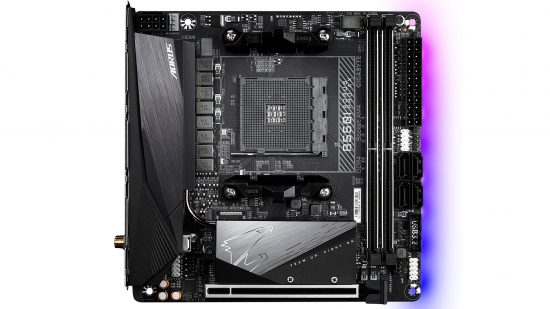
AMD, like Intel, limits overclocking to specific chipsets. Its B-series and X-series chipsets such as X670 or B650 support overclocking, but its A-series chipsets don’t, at least officially, although some manufacturers have found ways around this limitation.
However, as overclocking can put more pressure on the surrounding power circuitry and its cooling, even if you find an A-series chipset motherboard that allows overclocking, you’d be well advised to opt for a more capable board based on an X or B-series chipset.
How to overclock your CPU
There are several ways to change the multiplier of your CPU. You can even do it from within Windows using your motherboard’s software, or with AMD and Intel’s own overclocking programs – Ryzen Master for AMD and XTU for Intel. However, Ryzen Master won’t save your settings between reboots and XTU can be hit or miss, depending on which settings you tweak.
While they’re useful tools for testing and tweaking from the comfort of the desktop, you’ll want to use your motherboard’s software or preferably the EFI. Using the EFI will mean your overclock is always applied the instant you fire up your PC; motherboard software can lack certain options, while also taking a minute or more to load and apply your overclock.
Increase the CPU voltage for overclocking
Pushing your CPU to the limit usually means you need to increase the CPU voltage (often called the vcore), as a higher CPU frequency means the transistors inside your CPU are switching faster. As they switch faster, the voltage needed for them to work properly increases, as the reduced switching time requires the voltage to hit a certain level in less time.
A higher voltage means the transistors will work properly at higher frequencies. If the voltage is too low, it won’t work properly, and your PC can crash or exhibit overclocking-related stability issues. If your PC does crash here, though, it’s unlikely to be irreparable. This is just your CPU’s way of saying it needs a higher vcore – it’s a bit like running out of fuel in a car.
However, you don’t always need to increase the voltage and you should always try to lower it as much as possible. You may find that you can add a small overclock without adding any extra voltage, and you may even be able to reduce the voltage compared with stock speed too, lowering heat and power consumption.
The vcore, like the multiplier, is a key element of overclocking and you can adjust it using AMD and Intel’s software mentioned above, your motherboard’s own overclocking utility or preferably in your motherboard’s EFI.
Will I need a better cooler?
Whether you need to upgrade your cooler depends on so many factors that there’s no easy answer. In general, though, the stock cooler that comes in the box with some CPUs isn’t usually sufficient to handle a decent overclock.
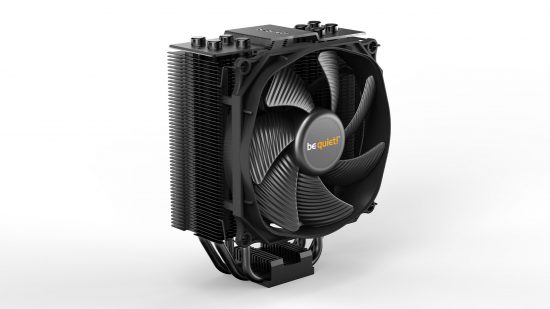
In most situations, though, having a basic $35 aftermarket air cooler is a good starting point, and it should be able to cope with moderate overclocks on 6-core CPUs and even AMD’s 7nm 8-core CPUs at a stretch too. Your overclocking headroom will also depend on your case’s cooling abilities, as well as the ambient room temperature.
Before you start
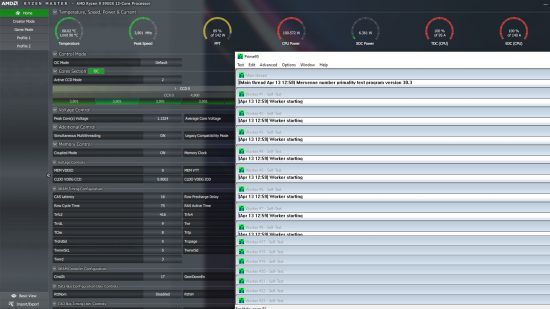
We’ve highlighted various safe settings you can use to get started with overclocking later in this guide, but first you’ll need to see how your current cooling copes with your CPU. To do this, grab CoreTemp for Intel CPUs and AMD Ryzen Master for AMD CPUs. These apps will tell you the temperature of your CPU. Now download Prime95 and run the smallest FFT test, making sure that AVX instructions are disabled.
Check the CPU temperature in the software after five minutes. You’ll need it to be below 80°C for AMD CPUs and 85°C for Intel CPUs, as the latter often run a little warmer anyway – an overclock resulting in load temperatures in the 90s is acceptable. This is a worst-case scenario, as games and most software won’t put this much load on your CPU.
If your results are close to these limits, even at stock speed, there are a few experiments you can try. Firstly, removing old thermal paste from the cooler and reapplying fresh high-performance paste can knock 5°C off these temperatures. You can also check your cooler’s fan speeds are set to ramp up properly and if you’re using a liquid cooler, try increasing its pump speed.
Finally, remember that no two CPUs are the same when overclocking. Some will require more voltage to hit a certain frequency. If you try our settings and they still don’t work, kick the frequency back 100MHz and try again. Eventually, you’ll find a stable frequency for that voltage.
Test your overclock
Testing your overclock is vital, or you risk having a flaky, unstable PC. We’ve found the Cinebench R23 multi-threaded test to be a great stability test – it will often crash even when Prime95 remains stable. The new R23 version even allows you to extend the usual benchmark to 30 minutes for stability testing. There’s no substitute for using your regular programs too, though, so once your system is stable in Cinebench, play your favorite games or use your content creation programs to ensure your PC is rock solid.
Overclocking Intel CPUs
Until recently, Intel used a 14nm manufacturing process for several years and CPU generations, and these 14nm processors are generally happy to receive higher voltages than their 7nm AMD counterparts. In addition, Intel’s 14nm CPUs overclock to similar levels with similar voltages across generations, so whether you have 8th, 9th, 10th or 11th-generation CPUs, you should be able to use similar settings to the ones in this example guide using a Core i5-11600K.
A vcore of 1.4V is generally considered to be the upper limit for overclocking Intel’s 8-core and 10-core CPUs, but motherboard manufacturers regularly state that using a little more, such as 1.45V, may help to get maximum overclocks stable on its 6-core CPUs. With fewer cores, heat is less of an issue.
However, you’ll still need a large air cooler or liquid cooler to cope with this voltage, so don’t be surprised if your CPU gets too toasty at these voltages and you’re forced to lower them. Using higher voltages can potentially shorten the lifespan of your CPU as well.
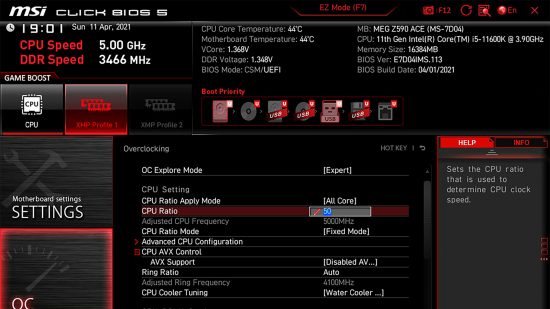
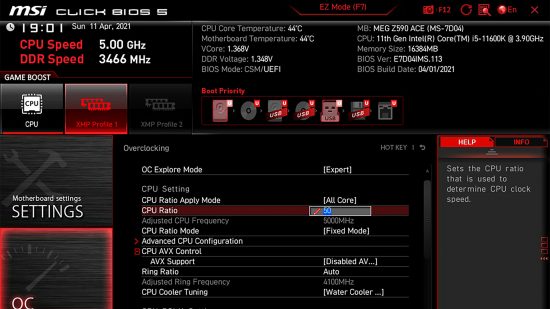
Start by locating the overclocking section in your motherboard’s EFI, which you usually access by pressing Del when your PC starts up. The overclocking options are usually found in a section labeled ‘advanced’ or ‘overclocking’. You’re looking for a setting called multiplier or CPU ratio.
Here you can enter your chosen multiplier – in the case of our example, we’re inputting 50, which multiplies the 100MHz base clock and gives us an end CPU frequency of 5000MHz, or 5GHz.
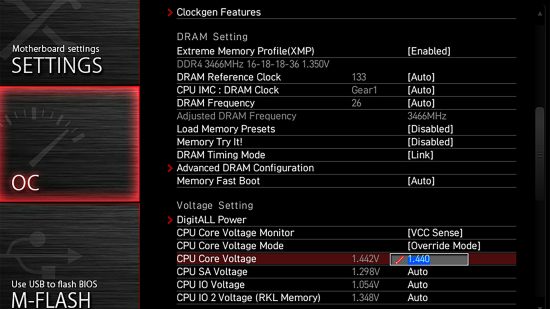
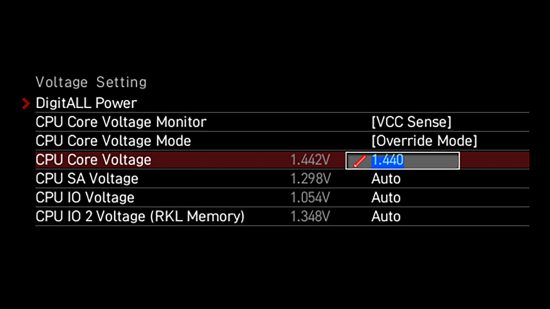
Next, you need to input a vcore. We’ve opted for 1.44V, which should be enough to get to 5GHz across all cores with our liquid-cooling setup. If you have a less powerful cooling setup, a Core i5 -11600K should be able to hit 4.9GHz with a 49x multiplier and a 1.375V vcore.
Additional Intel steps
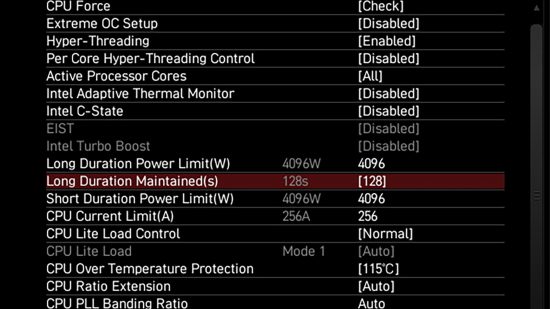
If your settings don’t result in a stable system, or if your CPU clock speed doesn’t stick at your settings, there are some additional tweaks you can try. In the advanced CPU settings in your motherboard’s EFI, you can increase the power, current and duration limits to their maximums. This should allow the CPU to stretch its legs and maintain an overclock under high loads where it might otherwise drop back.
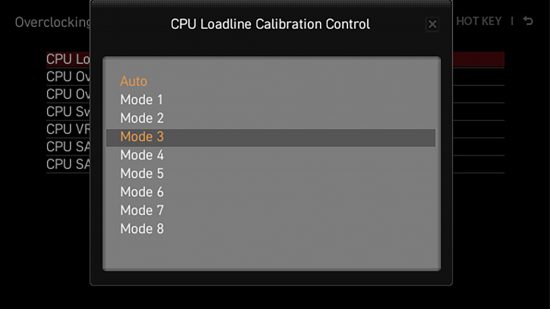
Next, there’s a setting called loadline calibration, often found in the CPU power settings. When a CPU is under load, the vcore can fall – a phenomenon known as vdroop. This can cause an otherwise stable overclock to crash. Loadline calibration will add a certain amount of extra voltage in these situations to counteract vdroop.
The lower the number, the larger the extra voltage applied. Start with the third highest, which is usually what motherboard manufacturers recommend for overclocking if a simple vcore and multiplier tweak doesn’t work.
Another setting you can try to tweak is the CPU cache or ring ratio. This adjusts the frequency of certain parts of the CPU, such as the cache and memory controller. A higher ratio means more performance, so you should try to increase this setting once you know the rest of your overclock is stable.
Tweaking individual Intel cores
If you want to delve deeper into overclocking your Intel CPU, there are plenty of other tweaks you can try. For starters, you can change a lot of settings on a per-core basis. You can disable Hyper-Threading on specific cores, which can improve performance in some games, so you could disable it on the first four cores, but enable it on the remaining cores to give a boost in multi-threaded workloads.
You can also change the multiplier on individual cores. The benefit of this is that not all cores on a CPU might be able to hit a certain frequency in an all-core manual overclock. For example, we could only reach a maximum 5GHz all-core overclock with our Core i5-11600K, but by bumping the first two cores of our Core i5-11600K to 5.1GHz, we saw the single-threaded score in Cinebench R23 rise from 1,559 to 1,577.
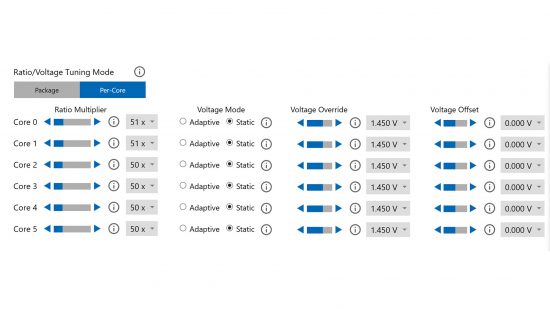
A handy tool here is Intel’s Extreme Tuning Utility, which enables you to tweak your CPU’s frequency on a per-core basis from within Windows for quicker stress testing. Start by finding your CPU’s maximum stable all-core overclock, then increase the first core’s multiplier by one and continue increasing it until you hit stability issues. Once that happens, roll the frequency back 100MHz and move on to the next core.
There’s an added benefit to tuning your CPU in this way, which is that you can also adjust the voltage for each core. A blanket 1.45V for all cores will likely be just enough for some, but more than enough for others, which means your CPU’s power consumption and heat output will be higher than necessary. Once you’ve finished boosting the frequencies, try reducing the voltage of each core in turn.
When you’re done, you can then apply the settings you’ve used in Intel’s software to your BIOS. This is highly dependent on your CPU and motherboard’s specific abilities, and extremely granular, so unfortunately we can’t suggest exact settings here for your CPU. However, while this tweak is time-consuming, it’s relatively easy to do and can enable you to squeeze extra performance out of your CPU, as well as reducing and heat and power consumption compared with an all-core manual overclock.
Intel Performance Maximizer
We’re all in favor of automatic overclocking software, so long as it actually works. Intel’s freely downloadable Performance Maximizer actually does a reasonable job, so we’ve included it here if you’re not quite ready for manual overclocking, or if you just want an easy fix. The software will restart your PC and start a series of stability tests with different voltages and frequencies.
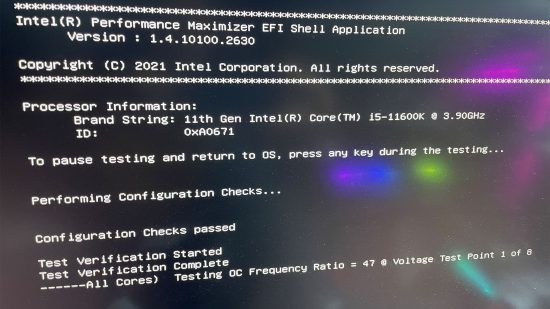
We ran it on our Core i5-11600K, and it took around 30 minutes of testing time, resulting in the all-core boost frequency rising from 4.6GHz to 4.8GHz. However, the software also appears to be very liberal with the voltage and not particularly aggressive with the frequency.
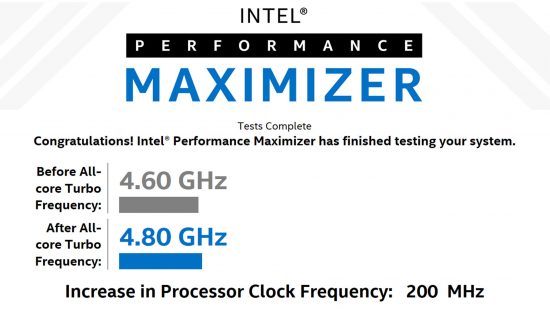
Our own manual overclock sees 4.9GHz as an easy target with 1.375V, but the software plumbed in 4.8GHz with a hefty 1.4V vcore. It was stable, but not particularly refined, although unlike AMD’s Ryzen Master software, it did make the overclock stick between reboots. It’s a good starting point for getting the figures for a manual overclock, though, and it seems to be trustworthy in terms of getting a stable overclocked system.
Overclocking AMD CPUs
As we’ve mentioned previously, overclocking your CPU is all about considering the gains you’ll see, as you don’t always get a lot of headroom, thanks to manufacturers sailing close to the wind with their boost frequencies. We’ve been talking about this a lot in our reviews of AMD CPUs, as they’re especially tight in terms of overclocking headroom.
The Ryzen 7 5800X, for example, could only hit an all-core overclock of 4.6GHz, which is 100MHz lower than the peak boost frequency of 4.7GHz and just 100MHz higher than the all-core boost we observed of 4.5GHz.
However, AMD’s 6-core CPUs have often been more suitable for all-core overclocks, as they have comparatively low all-core and peak boosts, but have similar headroom to more expensive models. If in doubt, a manual overclock is a good test, and if multi-threaded speed is your goal, then it can be worth losing a couple of hundred megahertz of peak boost across one or two cores if you gain the same amount over the stock speed all-core boost.
A good tool for testing an AMD overclock is Ryzen Master – AMD’s monitoring and overclocking software. It allows you to apply overclocks within Windows to speed up testing, so it’s well worth using. For Ryzen 5000-series CPUs, you don’t want to use a vcore of more than 1.3V for an everyday overclock, and ideally you want a vcore closer to 1.25V, as AMD’s latest 7nm CPUs can degrade in a relatively short time frame if they’re seriously overvolted.
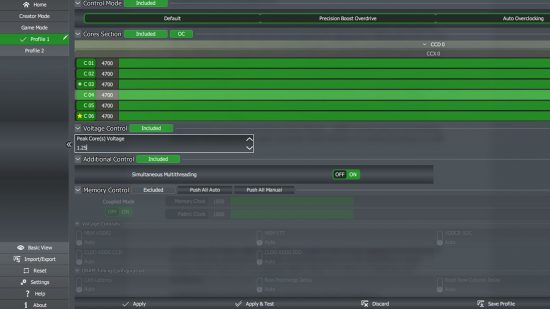
Start by applying a CPU frequency and voltage in Ryzen Master’s manual section – here we’re aiming to get our Ryzen 5 5600X up to 4.7GHz with a 1.25V vcore. Now go ahead and test your overclock using Cinebench and Prime95. With AMD CPUs, it’s especially important to reduce the vcore as much as possible. From here, once you find a stable overclock in Ryzen Master, you’ll need to then transfer the settings into your motherboard’s EFI, as Ryzen Master won’t make your overclock stick if you reboot your PC.
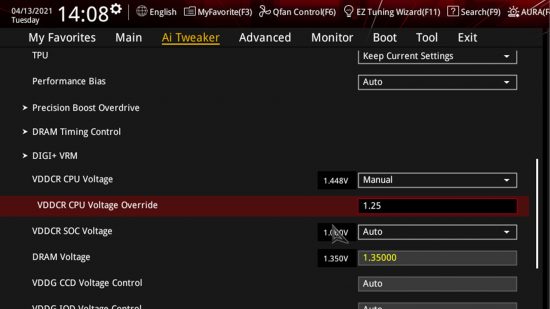
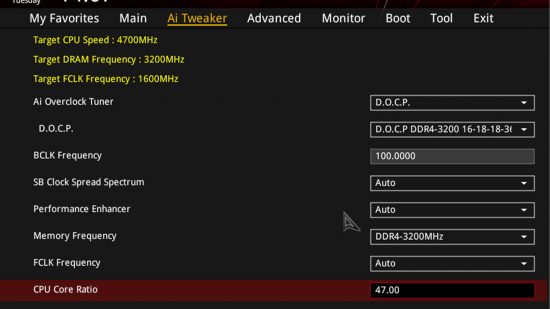
Locate the advanced or overclocking section of your EFI, then find the CPU ratio or multiplier field. In our case, we’ve inputted ‘47’ in order to hit a CPU frequency of 4.7GHz. After that, locate the vcore or CPU voltage option and input your required voltage – in our case, that involved setting the CPU voltage section to manual, and then inputting 1.25 into the override field.
Precision Boost Overdrive
Precision Boost (PB) is AMD’s boosting tech, but the company also has a secondary layer of boosting called Overdrive (PBO). This is manually controlled by you, but it isn’t a manual overclock. Instead, you can increase certain limits in the hope that the algorithm will see cooling and power headroom, and apply higher frequencies, or maintain stock boosts for longer.
This is where good cooling and a decent motherboard are helpful, although with the original PBO, the gains are still often modest. The advantage, though, is that any gains will be paired with the fact that the CPU will continue using its boosting algorithms, which isn’t the case with a manual overclock.
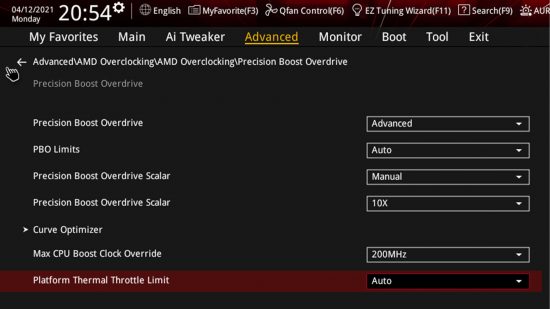
PBO allows you to increase the voltage applied to the CPU by using a ‘scalar’ setting. This increases the power and thermal limits of the CPU to enable it to hit higher frequencies. A scale from one up to ten is available, with ten increasing these limits the most, but high settings can increase temperatures and power draw significantly, so you’ll need to test them on your own PC to see how it copes.
There’s also the Boost Override feature. This allows you to set a boost frequency limit over and above stock boost speeds. The maximum is 200MHz, but in addition to cooling and power delivery, the way this is applied to each Ryzen CPU can vary. Some CPUs get a higher peak boost on a single core, while others benefit more in terms of multiple-core or all-core frequencies.
Our Ryzen 7 5800X saw no benefit from PBO in the all-core boost, hitting the same figure of 4.523GHz under load. This isn’t surprising, given that our own experience with the CPU and manual overclocking showed it was already running close to its limits. We did see the peak single-core boost hit 4.95GHz on occasions compared to 4.875GHz at stock speed, though, which saw the single-core test in Cinebench rise from 1,579 to 1,586.
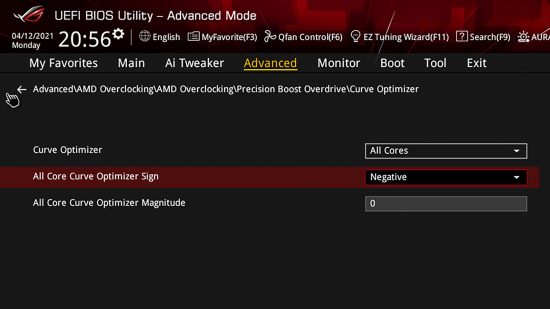
AMD has also recently introduced Precision Boost Overdrive 2 (PBO2), which takes the tech much further and is rather complicated. Instead of plumbing scalars into the EFI, PBO2 gives you much finer control, with up to 30 ‘counts’, each of which is the equivalent of 3mV-5mV.
In other words, you can adjust the voltage by 90-150mV in both a positive or negative way. PBO2 will actively look to boost the frequency along the whole curve, and with the extra thermal headroom provided by using the negative option, it may boost higher.
However, we found that it did little to increase performance in either negative or positive options, with its emphasis being more on reducing voltages at specific frequencies, which in turn enable your CPU to run cooler.
Our AMD Ryzen 7 5800X got an all-core boost of 4.7GHz with PBO2 enabled, which is 200MHz higher than at stock speed when using a positive count of 20. However, even then it still turned out to be slower in a multi-threaded run of Cinebench, and in the single-threaded Cinebench test for that matter. We tried the same approach with the Ryzen 9 5900X, but got similar results, even with a custom water-cooling system – the CPU was ultimately faster at stock speed or with standard PBO enabled.
You’re now fully equipped with all the overclocking knowledge you need to get started (and then some), so why not have a go with your own CPU if it has an unlocked multiplier? It’s a great way to get some extra performance for free, particularly if your CPU is a little underpowered or showing its age. If you’re planning an overclock as part of a new build, then you’ll also want to read our full guide on how to build a gaming PC, which covers every step of the process.
