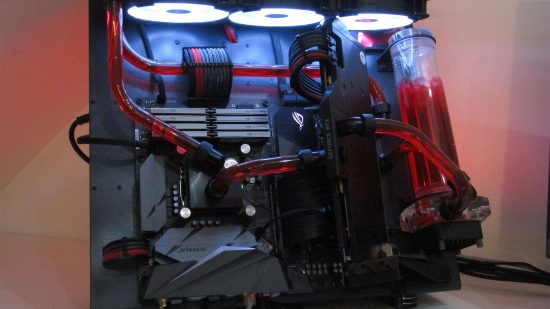
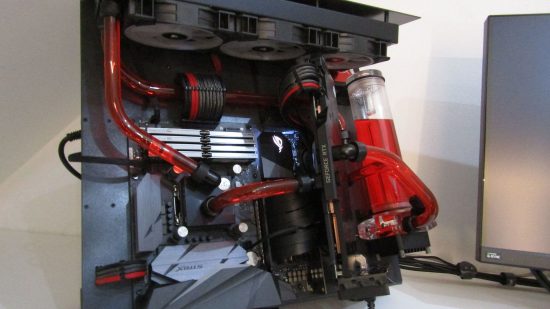
The world of PC enthusiasts is divided when it comes to the prospect of an open-air PC build. Some love the fact that you can see all of the glorious PC hardware up close and personal, while others worry about the constant need for dusting. We love this custom open-air PC case, though, which was scratch-built by Custom PC reader Michael Sheppard, and features an angled graphics card and incredible cable tidying work.
Custom PC has been celebrating the best PC builds since 2003, and our Facebook group has over 375,000 members. We’ve seen many custom gaming PCs, from case mods to scratch builds. Here we talk to Michael about how he made this open-air water-cooled PC build, which he calls Project Z.
Custom PC: How did this project start, and what inspired you to build an open-air design?
Michael: The whole project hatched from a fellow modder who kindly donated two 360mm EK SE radiators to me, after I helped him with the custom cables for his own build. I had also just built myself a DIY metal bender brake, so obviously I wanted to use that too.
This was my first mod that I’ve ever done from scratch, and I wanted to use an open-air design because I wanted to display the cables, as that’s where my passion lies. However, I also didn’t want the restrictions of working within a case and enclosing everything in such a tight space.
Custom PC: How did you go about designing the custom chassis?
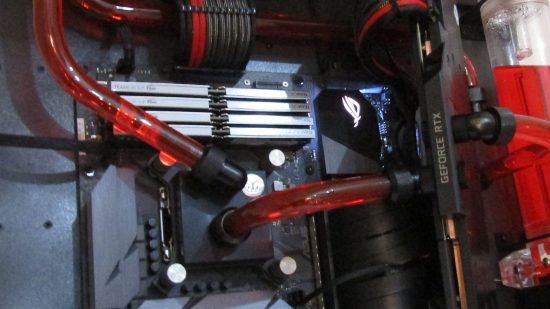
Michael: I always knew that I wanted to use the ‘Z’ shape, it was just a case of ensuring that all the gear was going to fit onto the framework. There was no CAD involved – I actually went back to basics, and used a pen and paper. I planned out every measurement, filling pages with sketches of different scenarios on where components could be placed. However, because it was a unique shape, there was no reference to which I could refer, so it was really just a learning process.
Custom PC: That’s some very neat cable routing – how did you go about planning it?
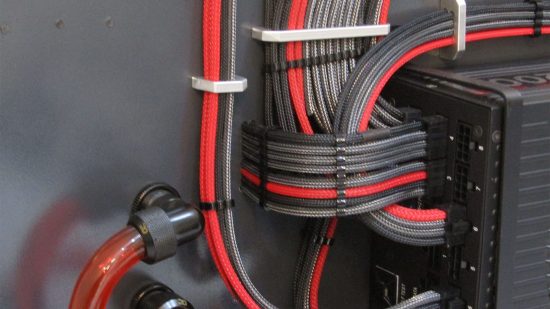
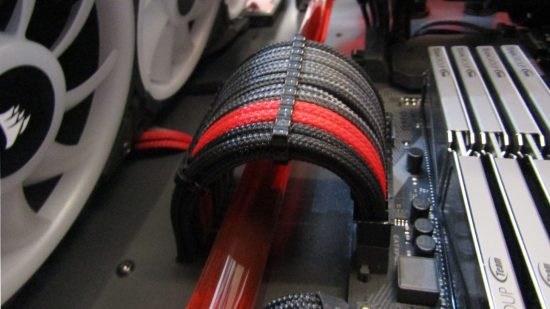
Michael: I really wanted to show off my skills in crafting custom cables, so tidy cable management was a must! I even handcrafted all the combs myself to ensure they were exactly how I wanted them.
Then it was a case of sketching where I wanted the cables to be placed onto the frame, using clean routes that avoided components. With the tubing, it was a case of using short, simple and single bends, as it’s not my strongest area. I chose the most logical tubing route in order to keep the build clean and tidy.
Custom PC: Where does the tubing go round the back?
Michael: It goes straight into a Y fitting to a tap or drain, then into the radiator, back out and to the pump. Nothing too complicated.
Custom PC: There are some clean bends in the water-cooling loop. What tubing did you use, and how did you bend it?
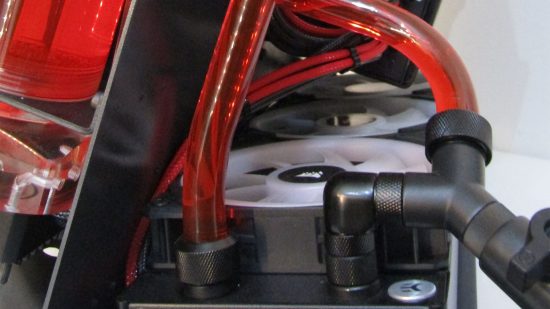
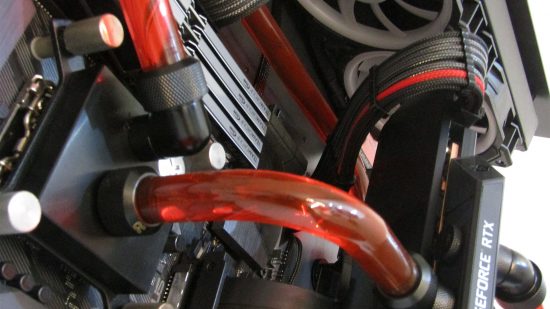
Michael: It’s Alphacool’s PETG tubing, and bending it involved using a heat gun at a low setting, a lubricated insert and bending by eye with a steady hand, taking it slowly with lots of patience. I’m still a beginner, so I made plenty of mistakes along the way, but with lots of trial and error, I was able to come up with the simple clean bends I needed.
Custom PC: Tell us about the build process. What tools and materials did you use to make the various custom parts?
Michael: This build was a learning process, as I’d never worked on a project at this level before. After building the metal bender brake, I knew I wanted to use steel for the main frame. Once I had the sheet of steel in the right size, it was a case of making two simple bends with the braker to get the ‘Z’ shape.
I then moved onto the placement of the hardware. I knew where I wanted the motherboard to be mounted from the start, so I worked the rest of the design around that. The radiator mounting was a little trickier; it took a lot of sketching onto the frame to ensure the placement was right, as I only really had one shot when it came to drilling holes into the frame.
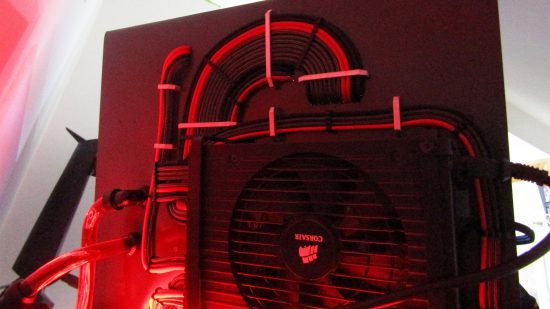
I then lay the radiator on the chassis, and sketched onto the frame again before drilling. I also created handmade standoffs from aluminum tubing, which worked great to lift the radiator off the frame slightly. This gave me a better idea of clearance, and after placing the pump as far over to the side as possible, I then had a good idea of the space available for a graphics card mounting bracket.
When it came to the graphics card mount, I made a template from cardboard to give me a good idea of where and how it would be mounted. Once I was happy with the template, I made the real bracket from a piece of 1.5mm steel.
This was actually one of the hardest parts of the build, as it was such a small piece of metal that had to be ground, shaped, filed, drilled and bent. However, it was vital for me to make sure these components were finished to a high standard.
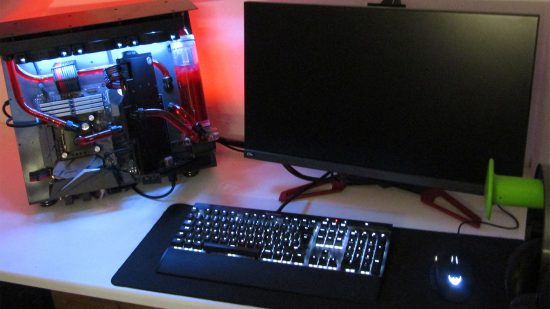
The holes for the cables in the chassis were all created using a hand drill. I started with a template, and then the 48 holes were punched and drilled four times in 1mm increments from 1mm to 4mm. This was a very lengthy process; I had to work slowly as there wasn’t any room for error.
Once all the holes were made and the power supply was mounted to the chassis, I then made the custom cables and combs. I actually made the cables longer than I needed, so it would be easier to connect them, mount them to the chassis, and then trim and terminate them once they were in the correct position, as no two wires were the same length.
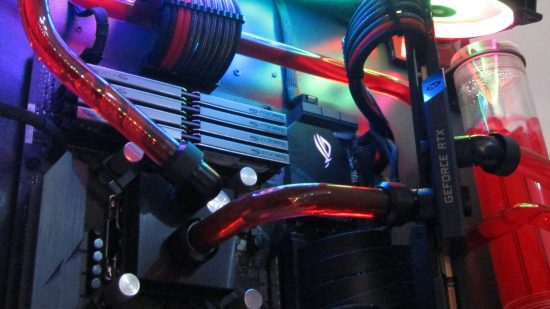
Keeping the build looking neat required me to make custom-length cables for each fan, as well as the RGB lighting. Both radiators have a fan hub and lighting hub mounted to them, and I made my own power connectors by shortening the hub wires so they could be hidden under the radiator.
I then ran the USB header cable to the motherboard from the hub through the chassis for RGB control. The difficult part here was syncing the two radiators together – I opted to disguise this cable as a PSU cable, and ran it with the power cables to join the hubs together.
The last main part was getting the build to power on and off, and reset. I decided to opt for a PCIe remote control – I didn’t want to add a button to the build, as it would also mean adding more unnecessary wires and custom fabrications, leading to more clutter on the frame.
Custom PC: Why did you decide to position the graphics card at that angle?
Michael: The idea came to me while I was mocking up designs. I was still undecided on what waterblock I was going to use, but I always like to clear waterblocks with fluid on show. I didn’t go for this look in the end, but I still like the positioning and it filled out the gap in the chassis perfectly. I mounted it by creating a custom bent steel bracket at a 45-degree angle, and it’s affixed with four mounting screws – it’s long enough to house the graphics card and accommodate a riser cable.
Custom PC: How are the PSU and reservoir mounted to the main chassis?
Michael: The PSU is mounted by two large U-shaped brackets, one on either end at the front and back. This is then affixed with an L-shaped bracket in the power supply mount. The reservoir is mounted using the standard top and bottom mounts, which each use three screws.
Custom PC: Did you come across any difficulties?
Michael: The longest bend on the tubing was one of the hardest parts for me. I found that making one bend was fine, but two always seemed difficult, as there was more room for error, and I would have to start it all again if it went wrong. I know this comes with experience, but I didn’t make it any easier for myself by choosing an awkward-shaped chassis. It all came down to practice in the end – sometimes I needed to be able to stop, walk away and come back with a fresh pair of eyes.
Painting the frame was tough as well. I was really happy at the prep and priming stages, but putting on the top coat didn’t go as planned. The weather was very much against me for a start, as it was too warm for the paint to adhere to the metal properly. I had to sand back the problem areas and try again. At this point, the only thing that helped was patience.
The final problem was that I misjudged the clearance for USB plugs going into the motherboard’s rear I/O panel. The plugs clashed with the desk when the computer was put in place, so I had to order some 90-degree USB adaptors, which improved the look of the case anyway, as it all looked neater.
Custom PC: How are you planning to keep dust out of your components?
Michael: There’s actually been very little dust building up since completing the build, but if I do notice any dust, I find that an unused makeup brush is great for removing it, as the soft bristles get into all the crevices.
Custom PC: How long did it take you to complete this build?
Michael: Projects such as this one take a lot longer than they should if you’re a working dad. I had the chassis crafted in February last year, and I did little bits here and there throughout the year, but the bulk of the work was done during October. I finally finished it in late November last year, so it took ten months in total.
Custom PC: Are you completely happy with the end result, or do you wish you’d done some of it differently in retrospect?
Michael: I’m really proud of the end result, especially the cables. As a beginner with water cooling, I didn’t want to create the outlandish runs that I’ve seen on other mods, but I’m really happy that I give it a go and I’ll never look back – I urge everyone to give it a try!
The only aspect I was a little dubious about was the paintwork on the frame, but it worked out in the end. I wish I could change the position of the SSD, though, as I would like it to be on show.
Project Z open-air PC specs
- CPU: Intel Core i7-8700K
- GPU: EVGA GeForce RTX 2080 FTW3
- Storage: 240GB HyperX Savage and 240GB Kingston KC 1000
- Memory: Team Group Vulcan T-Force 3000MHz
- Motherboard: Asus ROG Strix Z370G Gaming WIFI-AC
- PSU: Corsair AX1200i
- Cooling: EKWB Supremacy Evo Copper Acetal CPU waterblock, EKWB RTX 2080 Vector Copper Acetal GPU waterblock, 2 x EKWB 360 SE radiators, EKWB drain and Y-splitter fitting, 16mm Alphacool Eiszapfen hardline fittings, Alphacool Eisbecher 250mm pump-res combo, generic bulkhead fittings, 6 x Corsair LL120 fans
The PC builder
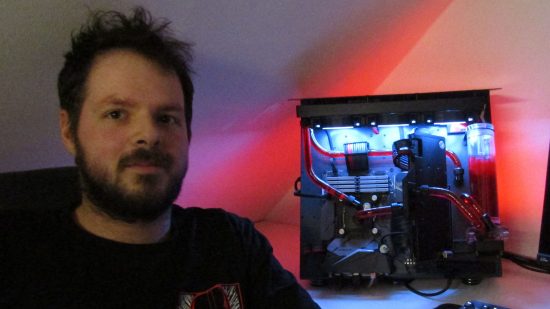
- Name: Michael Sheppard
- Age: 30
- Occupation: Chef
- Location: Sunderland
- Main uses for PC: Casual gaming, YouTube, music and learning graphic design
- Likes: PCs, modding, working on cars, spending time with my wife and daughter, cooking, eating, enjoying a craft ale or gin and listening to rock music
- Dislikes: Messy cables and sitting still
We love your work here Michael! Creating a custom chassis from scratch is no mean feat, and your commitment to cable tidying is incredible. If you like Michael’s work here, it’s also well worth checking out his open-air mini-ITX build, which is called Mini Z. If you’re new to the world of water-cooling and want to have go yourself, then make sure you also read our full guide on how to water-cool your PC.
Do you love seeing all of a PC’s innards on display like this, or would you worry about dust? Join the conversation to discuss this PC build with our 375,000+ strong member Custom PC Facebook group, where you can also submit your own PC build or gaming setup for consideration. If you want to see more outstanding custom PCs and gaming setups, check out our massive guide to the best PC builds.
