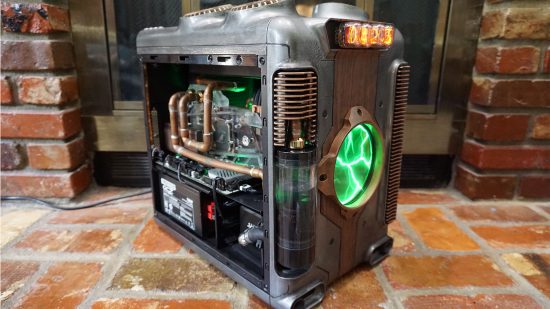
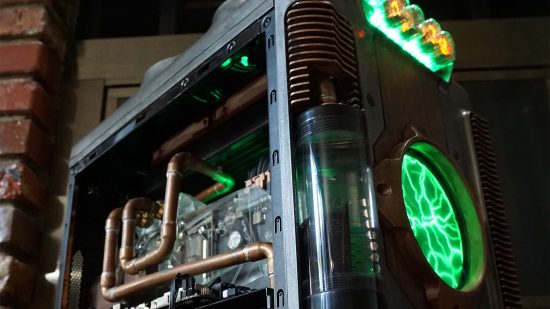
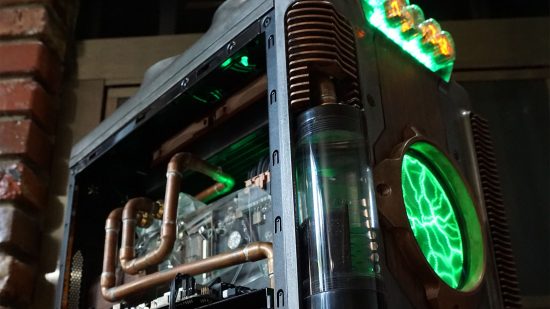
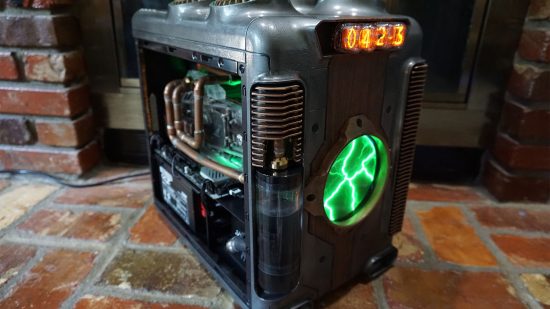
This steampunk gaming PC has loads of cool details, with hand-cut copper piping in the water-cooling system, a Nixie tube clock on the top, and a plasma disk on the front panel. The machine was built by Custom PC reader Aaron Fredregill, and he calls it Die Wasserkammer.
Custom PC has been celebrating the best PC builds since 2003, and our Facebook group has over 300,000 members. We’ve seen many custom gaming PCs, from mods based on existing case designs to scratch builds. Here we talk to Aaron about how he transformed his Deepcool Steam Castle case into a dieselpunk stunner.
Custom PC: What was your original goal when you set out to build this system?
Aaron: My inspirations for any given project are kind of hard to nail down. I’m always building or modifying something. I’d gone down the basic gaming PC route a couple of times already, and I finally decided that I wanted to build a unique system. I’m a fan of steampunk, horror and gothic vibes. My original plan was a steampunk theme. However, several people have pointed out to me that what I’ve built is more in line with dieselpunk, being a bit darker than the more optimistic nature of steampunk. I tend to agree.
Custom PC: Where did the design process start?
Aaron: I knew the different elements I wanted to bring into the design from the start. It was then just a matter of figuring out how many of those elements I could incorporate into the case without going too far. A lot of the process just involved taking ideas from my head and working on them one at a time, with some careful measuring and cutting. I’m not sure a single idea even went onto paper – there were a lot of Sharpie marks on the case before I painted over it all.
Custom PC: What case did you base this on and why?
Aaron: The case was one produced by Deepcool called the Steam Castle. It looks more like a retro refrigerator than a PC case, and I knew I could work with it to make a PC fitting of the ‘Die Wasserkammer’ name.
Custom PC: How did you create the green electrical storm effect on the front?
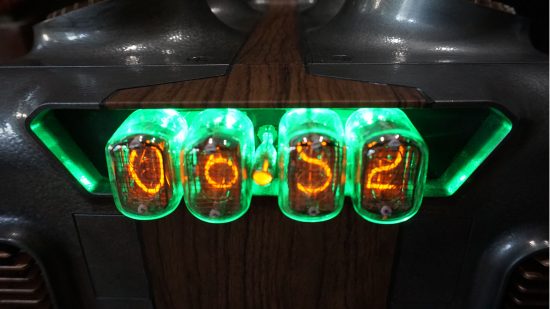
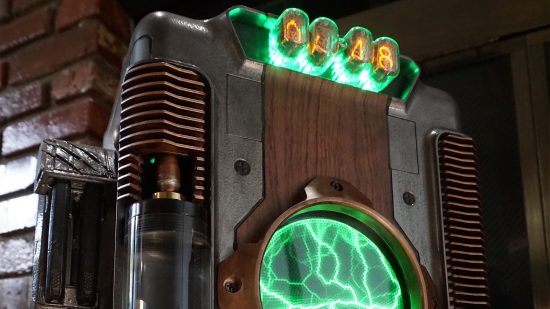
Aaron: That effect is actually created by an active plasma disk. I’ve loved the effect they create ever since I saw one as a kid on Star Trek in the Borg regeneration alcoves. It’s surrounded by an open aluminum fan grille from Mnpctech (mnpctech.com) and a layer of plastic to which I’ve applied some automotive tint to keep the brightness down a little. I’ve also incorporated a Nixie tube clock above the plasma disk, which
is backlit with green LEDs.
Custom PC: We love the mottled metal effect on the outside of the case – how did you achieve this?
Aaron: All of the paintwork on the case came from spray cans. I wanted it to look like weathered iron. I used a grey ‘hammered effect’ paint to cover the majority of the case, and the other accents come from a spray paint that comes really close to looking like actual copper. I also used a lot of flat black brushwork to wash over almost every part of the case, which is an easy way to make it look more worn and older than it is.
Custom PC: What’s that on the side panel?
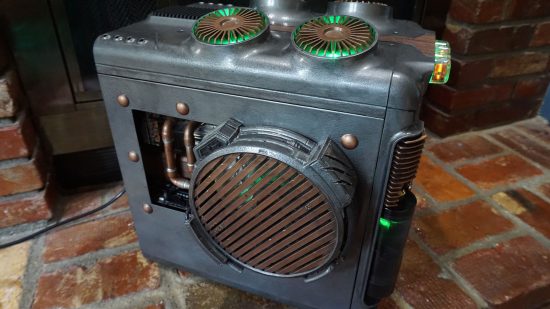
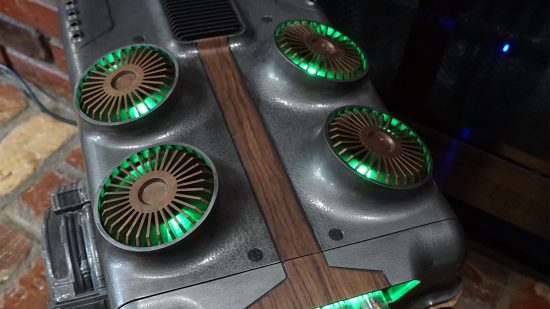
Aaron: I originally had some cogs on the side; along with the open fan grille in the front, these were made from fan covers that I purchased from Mnpctech. However, I felt that area was one of the parts that didn’t work for the aesthetics once I’d figured out that what I’d built wasn’t really steampunk. The grille that’s there now is actually the base of the Revenant statue that came with the collector’s edition of Doom (2016). I found a weirdly sized 170mm fan that fits into it and aids cooling.
Custom PC: How did you create the wood paneling effect on the front?
Aaron: The wood effect is made with high-quality textured vinyl, and it just about passes for the real thing.
Custom PC: Take us through the water-cooling system – how did you go about planning the loop, as well as routing and cutting/bending the piping?
Aaron: The water-cooling system came together slowly. The pipe is
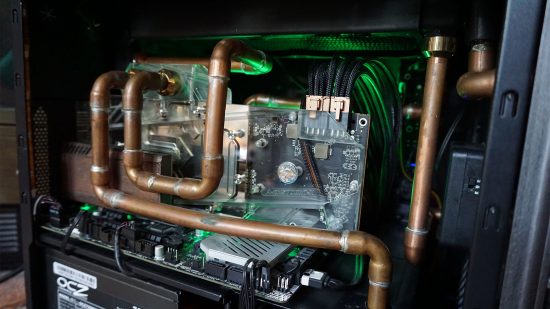
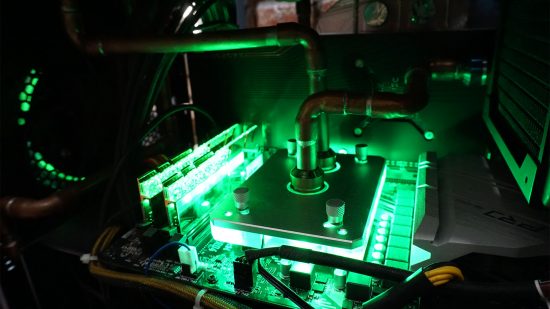
all copper with soldered copper fittings. I knew that I wanted as much of that piping to be visible on the side as possible. So, with that in mind, I laid out the major components in the available space and figured out the best way to route a single-loop system.
The only connection that isn’t copper is the one between the reservoir and the pump, as I wanted to control the vibration and for that area to also act as the bottom mount for the reservoir. Most of this work was done slowly, cutting pieces of copper pipe and then experimenting to get the right angles before joining them together.
Custom PC: What coolant do you use?
Aaron: I originally used some green coolant, which was a nightmare. It looked great in the pictures, but clogged up all of the waterblocks with pearls after a bit. It was a Mayhems coolant called Aurora – I’m not sure Mayhems even makes it any more. Nowadays, I just use distilled water with a couple of stabilizers and maybe a little bit of green dye.
Custom PC: The copper heatsink fin stacks down the sides look great.
Aaron: They’re a stock feature to the case, and one that I knew would look great with a reservoir recessed into the fins. They’re all made of plastic with some convincing paint applied to them.
Custom PC: Is that a wood effect on the expansion card?
Aaron: I originally had an EVGA GeForce GTX 980 Ti hybrid card that came water-cooled from the factory. I used the same vinyl overlay method on it that I used to create the wood effect on the front of the case. It also had a ‘vertical mount’, simply as a product of the micro-ATX board laying flat in the case, but it does do a good job of showing off the card.
I’ve since gifted that card to my brother, and put some copper piping in a prominent place behind the window, along with the waterblock that’s now on my Radeon RX 5700 XT graphics card. The interior modifications don’t go much past that area, since so little of it is visible behind the wide panel. The card you can see is an Elgato HD60 Pro capture card, which has had a little paint job because it’s fairly visible behind the window now.
Custom PC: Was all the work done by hand, or did you use any CNC machinery?
Aaron: All the work was done with basic hobby-grade tools, apart from a few of the cuts made to the steel panels – I used an air-powered cut off-tool to make that work a little easier. Most of the mods on this case are bits that I fitted very precisely with quite a lot of Dremel work.
The Nixie clock on the top required a few components to be cut to make clearance, and another panel built behind it to close off the back. The reservoir on the side is one I chose after I measured the available space and figured out what diameter of reservoir I could fit in that space. There are no solid mounts on the reservoir – it’s held in place by the lower hose, as I mentioned before, along with the copper return and fill lines located at the top and side, plus a few strategic zip ties.
Custom PC: Did you come across any difficulties?
Aaron: A big concern of mine was the plasma disk and having that current flowing freely right by critical electrical components. A lot of care was taken to ensure that no electrical conductivity was present between the plasma disk and the case. One issue I later discovered was that the open aluminum grille surrounding it, even though there is a gap, has a slight bit of electrical charge to it while the plasma disk is on. It’s not a major concern, since the grille is also isolated, but it’s something I’m aware of.
Solidly mounting the reservoir with just the tubing connections, as I mentioned before, was another struggle, but I had to do it, as even a basic mount pushed the reservoir our further than I wanted it. Getting the right angles on the fitting took quite a bit of finicky pipe bending (and a few zip ties) to make it all fit well with a solid connection.
Custom PC: How long did it take you to complete this build, from start to finish?
Aaron: I’d already been using the case for a while without getting into modifying it. When I got started, it probably took a good couple of months to make this system, between tweaking bits of it, waiting for parts and figuring out what finishes I wanted to use.
Custom PC: Are you completely happy with the end result, or do you wish you’d done some of it differently in retrospect?
Aaron: I have a hard time ‘completing’ projects, because there’s always something else I feel I could do a little better, but I’m calling this one done. I’m happy with the result and feel like the project has lived up to the original concept well enough.
Die Wasserkammer steampunk PC specs
- CPU: AMD Ryzen 5 3600
- Case: Deepcool Steam Castle
- GPU: AMD Radeon RX 5700 XT
- Storage: 1TB Intel 660p SSD, 4TB Seagate BarraCuda hard drive
- Memory: 16GB (2 x 8GB) G.Skill Trident Z Royal 3200MHz
- Motherboard: ASRock X570M Pro4
- PSU: OCZ 700W
- Cooling: 1 x 120mm XSPC radiator, 1 x 240mm XSPC radiator, 3 x Noctua NF-A12 fans on the radiators, XSPC D5 pump with acetal top, Bykski CPU waterblock, Bykski GPU waterblock, 170mm intake fan. All radiator fans are in an exhaust/pull configuration. Hard, soldered copper tube with 90-degree fittings
The PC builder

- Name: Aaron Fredregill
- Age: 39
- Occupation: Automotive technician
- Location: Lincoln NE, US
- Main uses for PC: 3D modeling/printing, gaming and video editing
- Likes: Fast cars, espresso, dogs and my wife!
- Dislikes: Silicon chip shortages
This is a brilliant steampunk PC case mod, Aaron – we want to touch the plasma disk and watch the patterns. The Nixie clock is also a really cool touch, and we bow down to your pipe-cutting skills.
Check out our best gaming setups guide if you want to see more outstanding custom PCs, and if you’ve built an extraordinary PC of any description yourself, then we’d love to see it! Join our Facebook group if you’d like to submit your own work for consideration.
