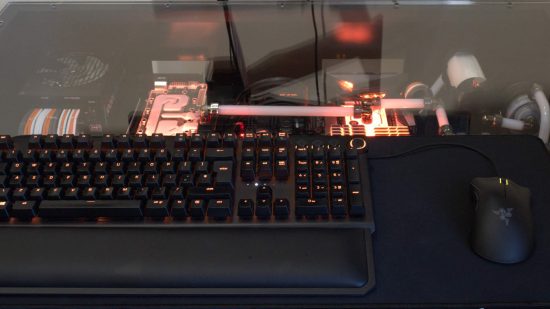
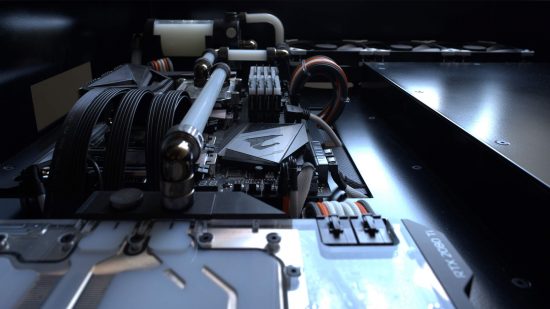
While there are off-the-shelf PC desk chassis available, if you want a desk that meets your exact requirements you’ll need to build it yourself, and this water-cooled desk PC is a fantastic example. Built from scratch by Custom PC reader Johnny Anderson, this custom water-cooled desk PC is a true one-of-a-kind.
Custom PC has been celebrating the best PC builds since 2003, and our Facebook group has over 375,000 members. We’ve seen many custom gaming PCs, from case mods to scratch builds. Here we talk to Johnny about how he made this hardline water-cooled desk PC build, which he calls Omega.
Custom PC: Let’s start with the initial inspiration. What made you want to build a PC into a desk?
Johnny: It was actually a previous Custom PC magazine, the L3p D3sk. I loved the idea of having all the hardware and wiring well organized and on show, with the added bonus of not having an ATX case on the floor. However, Peter Brands’ engineering skills far outstrip my own, so I was going to have to make the design within the scope of my abilities.
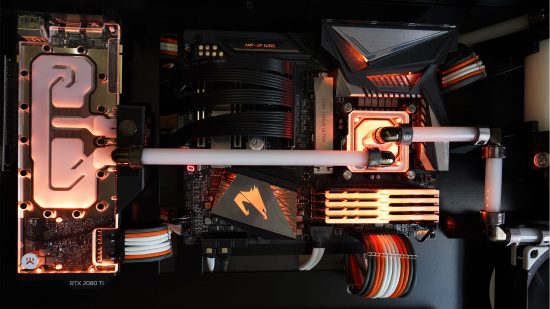
Custom PC: That’s not a readily available desk chassis model from the likes of Lian Li – that’s amazing work! Tell us about how you designed it, and take us through the build process.
Johnny: Thanks! The Lian Li desk cases are a work of art, but charge a premium. I like Lian Li’s use of aluminum though; it’s strong, light and relatively easy to machine, so that was my base material.
The design was created in SketchUp. I created a square section frame to which the panels and baseplate of the case would be screwed, then corresponding 3mm-thick rectangular panels for the front, back, sides and base. I then raided the 3D Warehouse to get an idea of where all the components should go.
I ordered a square section of aluminum cut to length, some laser-cut and powder-coated 3mm aluminum sheet panels, and a custom-sized 12mm Perspex top. These bits were all from different online retailers (see my build log for details). I then had to drill and M4-thread-tap about 130 holes in the frame, which was rather difficult and very tedious.
Given the accuracy required, I bought a smallish pillar drill for this job, which made it far easier. Then, with the rest of the desk assembly, it was a case of test-fitting each panel to the frame and filing down sections or making adjustments where possible.
Custom PC: How did you go about planning, measuring and cutting all the hard tubing?
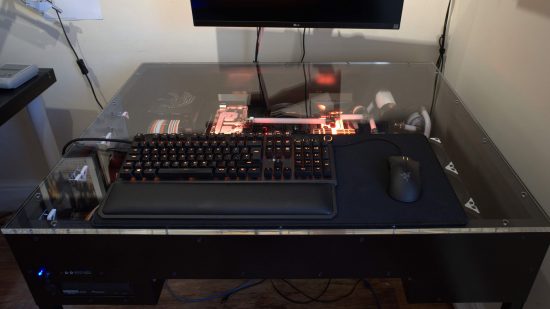
Johnny: Planning the route for the hard tubing is always the most difficult part of a build in my opinion. Although I’ve done quite a lot of water-cooled builds so far, deciding how I’m going to route the tubing is the part that always takes me the longest.
To start, I’ll always draw it up on a bit of A4 to get a rough idea of how many tubing runs I’ll need and what fittings will be required. I chose to use 14mm O/D PETG tubing, as I’ve worked with both that material and acrylic before.
Custom PC: How does the airflow system work in terms of direction and ventilation?
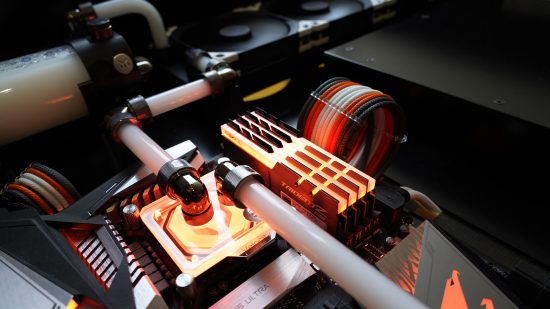
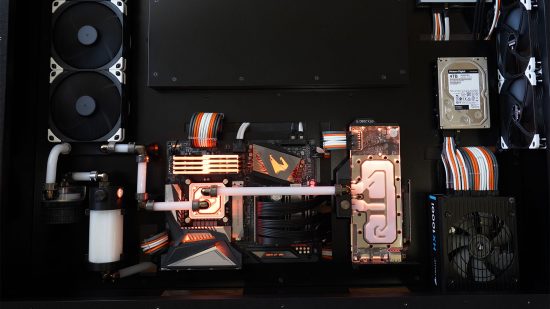
Johnny: Three 140mm fans provide intake on the left, which cool the hard drives and provide airflow to the motherboard. The 420mm radiator has three 140mm fans pushing air out the bottom of it on the right, with three corresponding circular cut-outs below, acting as an exhaust.
Custom PC: What made you decide to use hard tubing rather than soft tubing?
Johnny: I wanted all the lines and right angles to be as uniform as possible, which couldn’t be done with soft tubing. I’d never done any water cooling before, though, so watching many YouTube videos and reading through my old issues of Custom PC on the subject really helped.
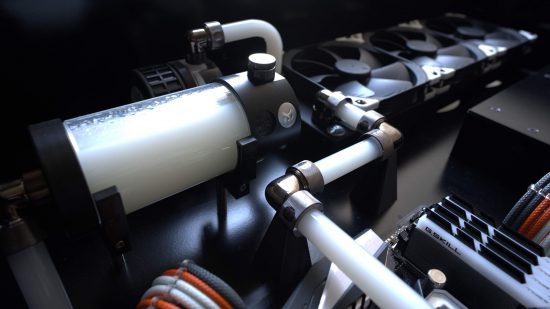
Measuring up and cutting wasn’t that bad, because all the components and waterblocks were in place at that point, so it was a case of trial and improvement. Oh, and the return loop from the graphics card goes under the baseplate. Between it and the pipe back to the reservoir, I also included a drain port to make maintenance easier.
Custom PC: What sort of considerations do you have to make when building a desk PC compared with a normal PC with an ATX case?
Johnny: If you’re designing a desk PC yourself, the first job is to make your list of basics. For example, every part that needs to plug into an external device needs to have its output ports oriented to the back of the case.
From there, if you’re going for clean lines, bends and how you want the rest of the innards to look, you can figure out where the rest of your components and wiring needs to go based on the ones you can’t move. Also, don’t forget that if you’re water-cooling, you’re now mounting on a horizontal surface rather than a vertical one, so the highest and lowest points in the loop will be much closer together than in an ATX tower.
Custom PC: What’s in the front panel on the side? Is that an optical drive we see?
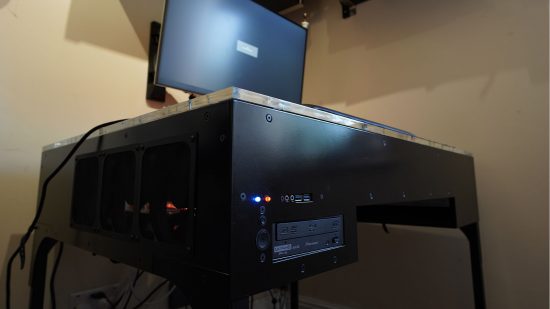
Johnny: That’s a 4K Blu-ray player, along with power and reset buttons, power and HD LEDs, headphone/microphone jacks and two USB ports for convenience.
Custom PC: How big and heavy is it? Is it practical to move?
Johnny: It measures 1,006mm wide by 755mm deep and, including the legs, 775mm high. It’s reasonably heavy, but I can move it on my own without too much difficulty, although only around the room in which it’s currently sitting, based on the measurement of the door frame I’ve just taken. Oops!
Custom PC: What’s in the box area at the front?
Johnny: That’s where my legs go! The front panel was originally rectangular, but I changed it to incorporate this space after I realized it was otherwise going to be woefully uncomfortable.
Custom PC: Where are all the cables hidden, and how did you go about working out where to route them all?
Johnny: On the underside of the base plate! I 3D-printed some cable combs I could mount on the underside of the base plate. From there it was just a case of making sure they didn’t get in the way of each other on the way back to the PSU.
Custom PC: How long did it take you to complete this project?
Johnny: I was adding to the PC’s design in SketchUp on and off over a period of around 18 months (work and life being the main inhibitors). It only really got into the build phase in March this year, and I then finished it somewhere around the start of July.
Custom PC: Did you come across any difficulties?
Johnny: I did discover that even laser-cut aluminum doesn’t quite match up with your SketchUp design if you don’t take the thickness of a powder-coat finish into account. The result was that, on a couple of edges, I had to file down the end of one of the panels by a couple of millimeters to make sure it didn’t overlap its adjacent edge when being screwed into the frame.
Custom PC: What did you learn from the build process?
Johnny: Other than getting to grips with water cooling and metalwork, the biggest learning curve was creating all the custom power cables. Each one required cutting to length, crimping, sleeving and terminating in the correct socket. I spent a lot of time with a PSU tester before plugging them into any components, but thankfully they all worked.
Custom PC: Are you happy with the end result, and would you do any of it differently in retrospect?
Johnny: I’m really happy with how it’s turned out. I think incorporating some kind of car boot-style pneumatic lift to the Perspex top would have been cool for easier access when water-cooling maintenance is required, but I’ll settle for undoing 18 screws.
Water-cooled desk PC specs
- CPU: Intel Core i9-9900K overclocked to 4.5GHz
- Graphics card: Nvidia GeForce RTX 2080 Ti Founders Edition, base clock OC to 1450MHz, boost clock to 1750MHz
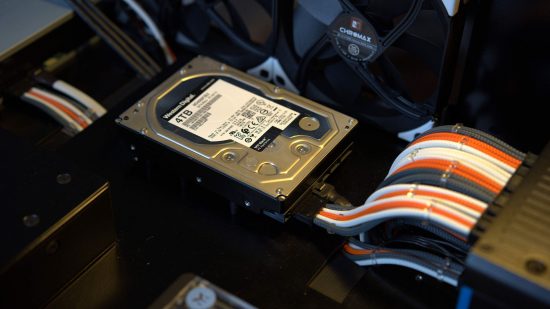
- Storage: 1TB Samsung 970 Evo Plus SSD, 4TB WD Black hard drive
- Memory: 32GB (4 x 8GB) G.Skill Trident Z DDR4 3200MHz
- Motherboard: Gigabyte Z390 Aorus Ultra
- PSU: Corsair HX1000i
- Cooling: EK-Velocity D-RGB Nickel + Plexi CPU waterblock, EK-Vector RTX 2080 Ti RGB Nickel + Plexi GPU waterblock, EK-XTOP Revo D5 PWM Plexi, EK-RES X3 150 reservoir, EK-CoolStream SE 420mm radiator, EK-CryoFuel Solid Cloud White coolant (premix 1,000ml)
The PC builder

- Name: Johnny Anderson
- Age: 34
- Occupation: Consultant business analyst
- Location: Leeds, UK
- Main uses for PC: Gaming, design, and visual analytics
- Likes: Led Zeppelin, Marvel, Five Guys, the EU
- Dislikes: Blonde male right-wing politicians, sprouts, Kardashians
We’re always impressed by PC cases that have been built entirely from scratch, and this desk PC is just superb. We love that the perspex top (which looks like glass at first glance) gives you a window onto the hardline water-cooling gear, and that the whole piece functions as a very attractive piece of furniture. Great work, Johnny!
What do you think of this water-cooled desk PC? Join the conversation to discuss this PC build with our 375,000+ strong member Custom PC Facebook group, where you can also submit your own PC build or gaming setup for consideration. If you want to see more outstanding custom PCs and gaming setups, check out our massive guide to the best PC builds.
