
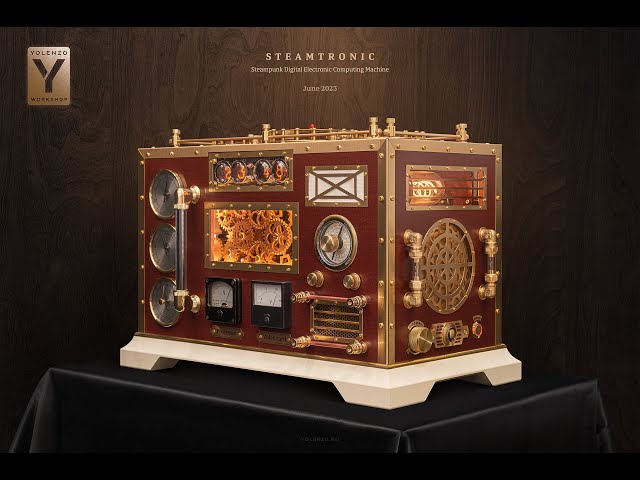
The craftsmanship on show in this steampunk PC build is nothing short of astounding, and its creation involved an enormous amount of work and experimentation. Called Steamtronic, this mini-ITX build was created by the Yolenzo workshop for a client, and features a custom case made from textolite, along with loads of brass details, analog dials, and a nixie clock on the side.
Thanks to our rapidly growing PC building Facebook page, we’ve seen many custom gaming PCs, from mods based on existing case designs to completely from scratch builds. You can even submit yours for consideration right here. Here we chat to Viacheslav Ilinskiy, art director of the Yolenzo workshop, about how his team built this stunning steampunk rig.
PCGamesN: What is Steamtronic all about?
Viacheslav: Steamtronic is a Steampunk Digital Electronic Computing Machine. The name represents a combination of two styles – modern reality, which is saturated with electronics and digital technology, and steampunk, with a style that incorporates the universe of steam engines and the fantastic mechanisms of the 19th-century Victorian era.

How did you plan out this build?
34 people contributed to the project, investing their soul and enthusiasm – I’m incredibly grateful to them for their faith in the ideas of the workshop and their professionalism. The project went through many stages – from the ideas in our heads, to paper sketches, 3D modeling, and then the preparation of drawings for factories.
What tools, machinery, and materials did you use
We used paper, pencils, pens, and cardboard to create the first sketches and tests to understand the dimensions of the project. We then used professional software to prepare ideas to be built by different factories. We made the walls from textolite (polymer-bonded fiberglass), using laser cutters, bending, and milling tools.
The external design is made from several premium materials, including textolite of the highest standard, along with decorative brass, copper, and a special style of plastic that’s used for manufacturing loudspeakers and car prototyping.

How long did this build take to finish?
More than half a year – the project turned out to be incredibly difficult. I remember with a smile the day when two engineers and I sat in a cafe and discussed the project. We all agreed what we would do, and where, and thought everything would be ready in three months. We shook hands, but the real adventures began as soon as we left Hobbiton.
You can find the necessary machines to do your work, but you might have to put in a large order right away, you might need to make a prototype, and the material could be expensive. What at first seems simple, can be very difficult to make, and expensive too. Just at the stage of selecting the right engineers, I went through a bunch of specialists and, as a result, met with 25 people. Do you know what the majority said? ‘We don’t want to sign our own death warrant, it’s impossible to do that. You are dreamers!’
Did you come across any difficulties?
Technology and precision machinery allow us to make projects at the factory level, where everything is even, the detail is in the joint, and there are no gaps. However, everything else is a titanic amount of work, where you need iron nerves, stubbornness, and faith in the idea of the project.
Just as an example, the brass screws I wanted are special. To understand this, you need to immerse yourself in the entire chemistry of the process and know the difference between brass alloys, how the different metals oxidize, and which impurities give you certain shades. The project includes screws from a factory in Germany, because a warm color of the shade was needed.
All these steps and decisions cost money, time, and effort, so I constantly had to compare products, experiment, take risks, and make sure the choice was right. These types of projects are a great responsibility, resulting in an incredibly stressful process, because you’re responsible for everything – the people, the result, and ideas that you propose. Every idea costs money, and the amount isn’t small!
I had to work hard to understand how my ideas would visually match the project. Before offering anything to a client, I try to carefully weigh the risks, and learn and study manufacturing technology – I need to understand the nuances, negative aspects, and difficulties that may arise in the future during assembly, as well as any interactions between different materials. I need to know how a material will react to heat, how to maintain it, and so on. Each step was carefully worked out, and I periodically had to find the right people to consult.

For example, the walls of the Stramtronics case are made of textolite, and this material wasn’t chosen at random. We went through different options: wood, steel, plastic, polymer stone, ebonite. and other exotic materials. Each material has its own subtleties, and of course processing methods to create the final product. You need to calculate everything, and understand how much it costs – no decisions can be made at random.
The workshop always respects the client’s money, so we look for a balanced option based on his desires – a balanced option, and a reasonable way of implementation. At first glance, the choice to bundle an Intel Core i5-10600 processor with a GeForce RTX 4090 video card might look bewildering – I’m sure you won’t find this spec combination anywhere else. However, there are weighty arguments and calculations behind this decision, based on an understanding of how the computer will be used, as well as full awareness and consent of the client.
One difficulty was varnishing the textolite walls. I turned to an organization that professionally deals with painting, so I took the walls to them, and chose the most expensive, high-quality varnish. The result was a fiasco. The varnish swelled, and we spent a month with them experimenting, with drying, not drying, painting different layers in various ways, and none of it worked.
I then turned to a professional retro car tuning company, and it was the same story – they went through a bunch of all kinds of varnishes and the result was terrible. I was already beginning to think that using textolite was a mistake, but at this point changing it would require new experiments with material samples, which would cost more time and money.

After a couple of days of thinking, I decided to paint the walls myself – my intuition suggested there was a wrong step being taken at some stage of the painting process. I ended up dismantling a shower room in my apartment with a grinder, and poured concrete over the area where I would paint the details, converting the room into a paint shop.
Then I started experimenting with varnish. I had a full-face protective mask, but I needed to put the facemask over my glasses, as I can’t see anything without them. Then, because of the resulting shape of the goggles around my temples, the lacquer fumes still penetrated through the mask, so I got poisoned.
I went to the doctor to get some contact lenses, which they ordered from Europe. I put them in, and they seemed fine, but I started seeing floating patches in my vision when I started painting. I went to the doctor again, and it turns out that I have a rare eye condition, and I couldn’t continue to wear the lenses. By that time, the painting had already been delayed by three weeks, so I had to look for a set of protective glasses to wear on top of my prescription ones.
I eventually found them, and then found the right stage to add the varnish in the painting process, so that the varnish lays flat on the material. This is just a story about the painting process, and it was like this with every detail in the project. I personally checked every element and detail, every screw, and every engineer’s edits. Everything went through my hands and received my personal approval before we showed the result to the client.
What inspired you to build Steamtronic, and what look were you hoping to achieve?
My Yolenzo workshop has a philosophy. Assembling a computer is a real art – the creative process of creating a single organism from many parts. To me, any computer assembly is a sacrament between the master and his offspring. The assembled computer is a metaphysical image of the person who ordered the assembly.
Everyone deserves an assembly that will accurately recreate their inner world. The more we know about the capabilities of the components, the better we understand how they interact, and the deeper we comprehend the subtleties of physical laws. We assemble a computer, and upgrade ourselves – that’s why we’re inspired by our clients.

Steamtronic steampunk PC build specs
- CPU: Intel Core i5-10600 (delidded)
- Graphics card: Nvidia GeForce RTX 4090 Founders Edition
- Storage: 1TB Samsung 960 Pro
- Memory: 32GB (2 x 16GB) Samsung DDR4 2666MHz
- Motherboard: Gigabyte Z490I Aorus Ultra
- PSU: Corsair SF750
- Cooling: Noctua NF-A12x25, NH-L12S, NF-A15, and NF-A9
We’re astounded by the amount of work and love that’s gone into this build – if we were Yolenzo’s client, we’d be mightily pleased to have this steampunk machine on display at home. It genuinely looks like a machine from yesteryear, with barely any indication that there’s a modern PC inside it.
This post originally appeared on Custom PC, which has been covering amazing setups for over 20 years and is now part of PCGamesN. Join our nearly 500k member Facebook group to discuss this build.
If you consider yourself to be an expert PC builder, you can submit your own custom PC build to us today for a chance of being featured on PCGamesN in the future. And if you’re looking for guidance on how to build a gaming PC for the first time, we’ve got you covered too with our step-by-step guide.