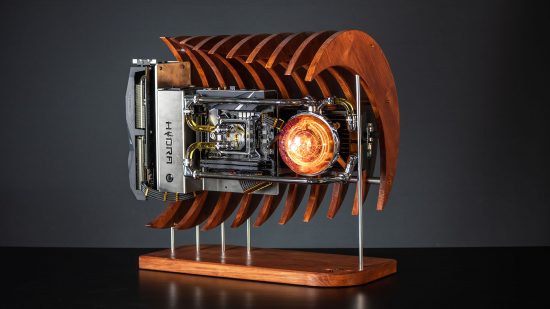
This outlandish wood gaming PC build takes inspiration from all sorts of places, from the famous Japanese Great Wave off Kanagawa painting to a dinosaur skeleton that PC modder Alessandro Zaiti saw displayed in a museum. This build, which its creator calls ODNA, is a stunning example of design and craftsmanship – we’ve never seen a PC quite like it.
Thanks to our rapidly growing PC building Facebook page, we’ve seen many custom gaming PCs, from mods based on existing case designs to scratch PC builds. You can even submit yours for consideration right here. Here Alessandro Zaiti explains how he made this fabulous mini-ITX wooden PC build.
Alessandro: Project ONDA began as my first attempt at 3D modeling and CNC machining, as I had just upgraded my workshop with a CNC machine and I could finally stop doing every single thing by hand. The design came from a brainstorming session, where I was just drawing lines and seeing what would happen.
‘Onda’ is the Italian word for wave. I’ve always been inspired by space and sci-fi when coming up with new designs, and ONDA was no exception, as the crescent moons are the central point of this concept. The way they wrap around the hardware gives off that wavy look I was looking for.
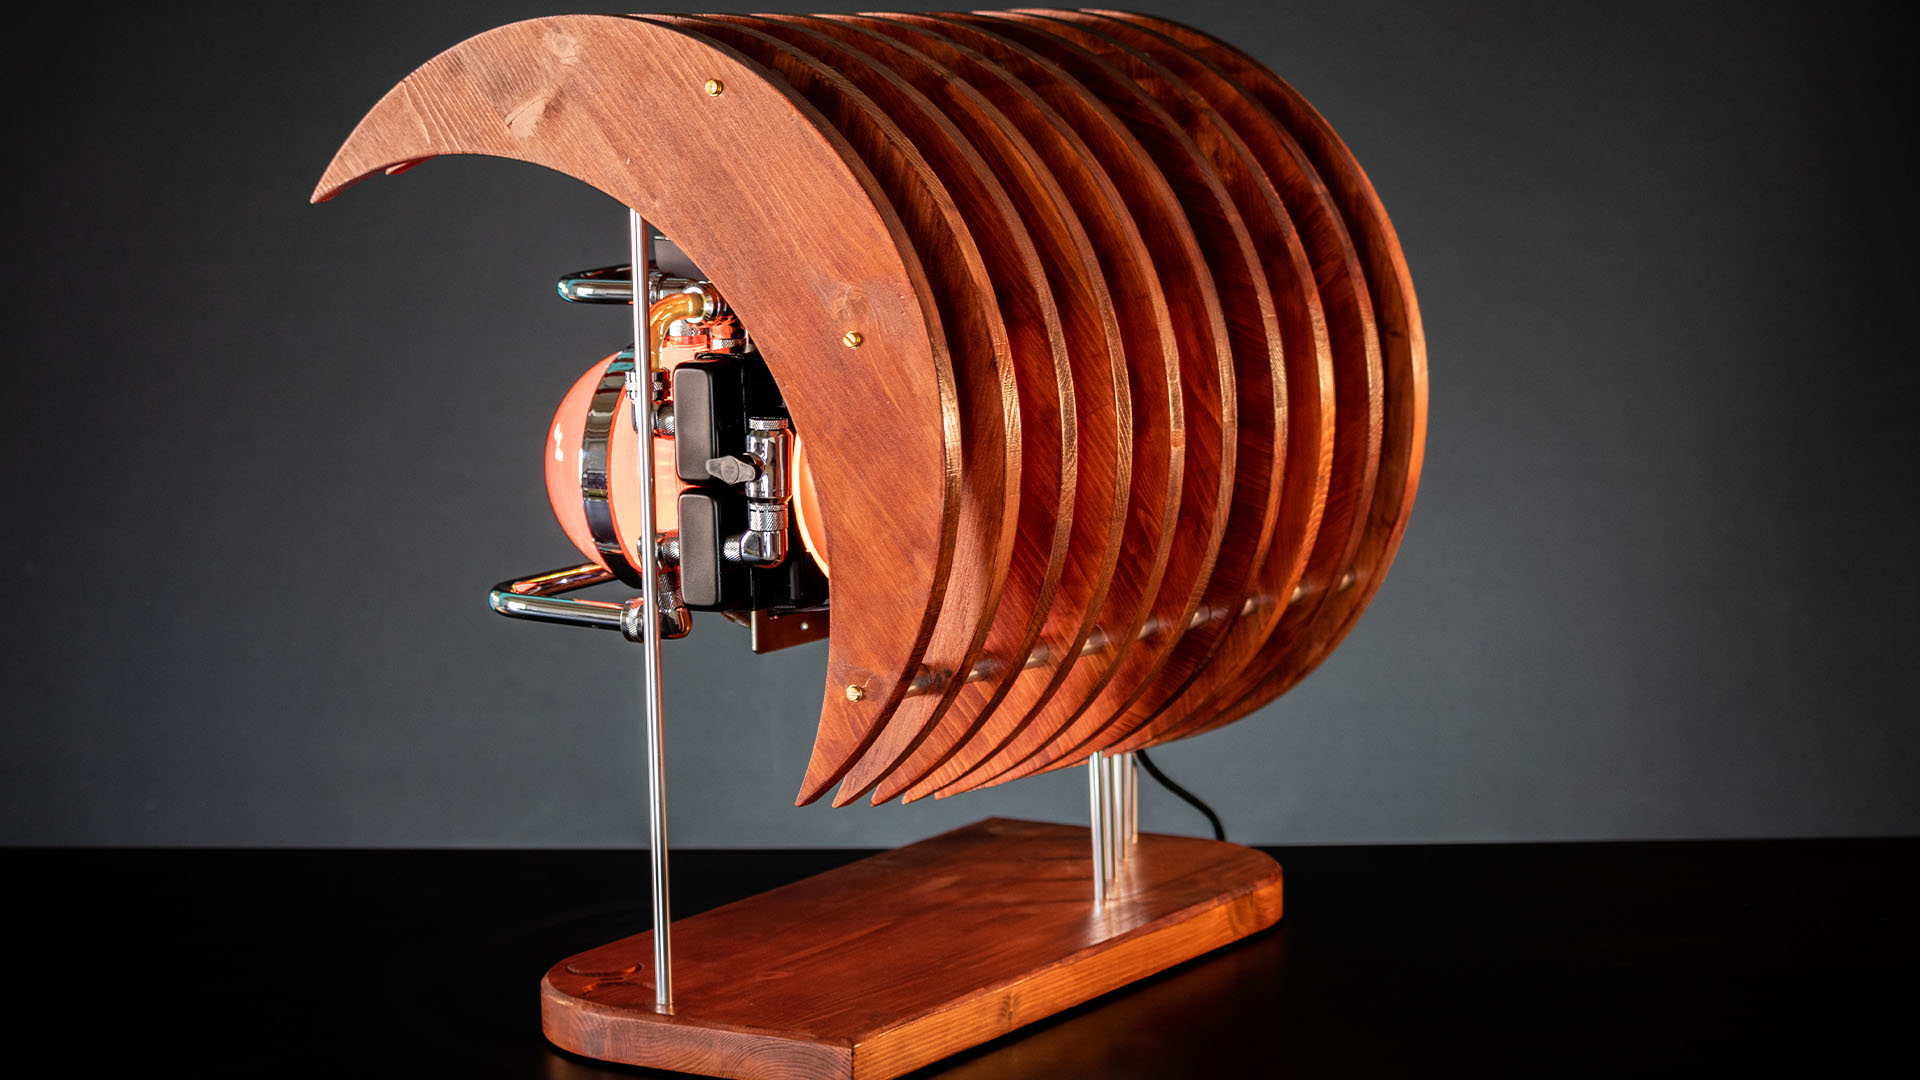
Other than the moon, I was inspired by a range of different other elements while designing ONDA: Japanese art; The Great Wave off Kanagawa; and the skeleton of a dinosaur displayed in a museum. There were a lot of very diverse inspirations and I think that’s why it looks so interesting and appealing to the eye.
Moreover, I’ve always been a big fan of floating things, and I really wanted to incorporate that feature into this concept, especially because of its open-air nature. I achieved this by making the mounting for the Hydra Mini as stealthy as possible, so that all the hardware seemed to actually float inside the wave. Also, the wave itself is suspended on a pedestal using aluminum rods, with inspiration again coming from dinosaur displays in museums.
Choosing the hardware
While this is clearly meant to be a mind-blowing build for its unique aesthetics, it’s still technically ‘just a computer’, so specs are important, right? Well, not for me really, as I mainly work with sponsors for these kinds of projects and they usually don’t have much high-end hardware to provide.
This build features a humble AMD Radeon RX 5500XT graphics card provided by my network HWLegend Modding, an Intel Core i5-9400F sent by an Italian store called PC Hunter, and 16GB of RAM from OCPC Gaming. So it’s a decent build for gaming at 1080p and for getting some work done.
Everything is powered by an SGX-650 by Seasonic, which is a super-cute SFX power supply paired with custom cables from CableMod, and cooled by custom water-cooling hardware from Alphacool. One piece worth mentioning is the Alphacool Eisball, which is the glowing eye at the center of the PC. ONDA received a lot of praise for this addition because it was actually making good use of the peculiar spherical pump/reservoir combo.
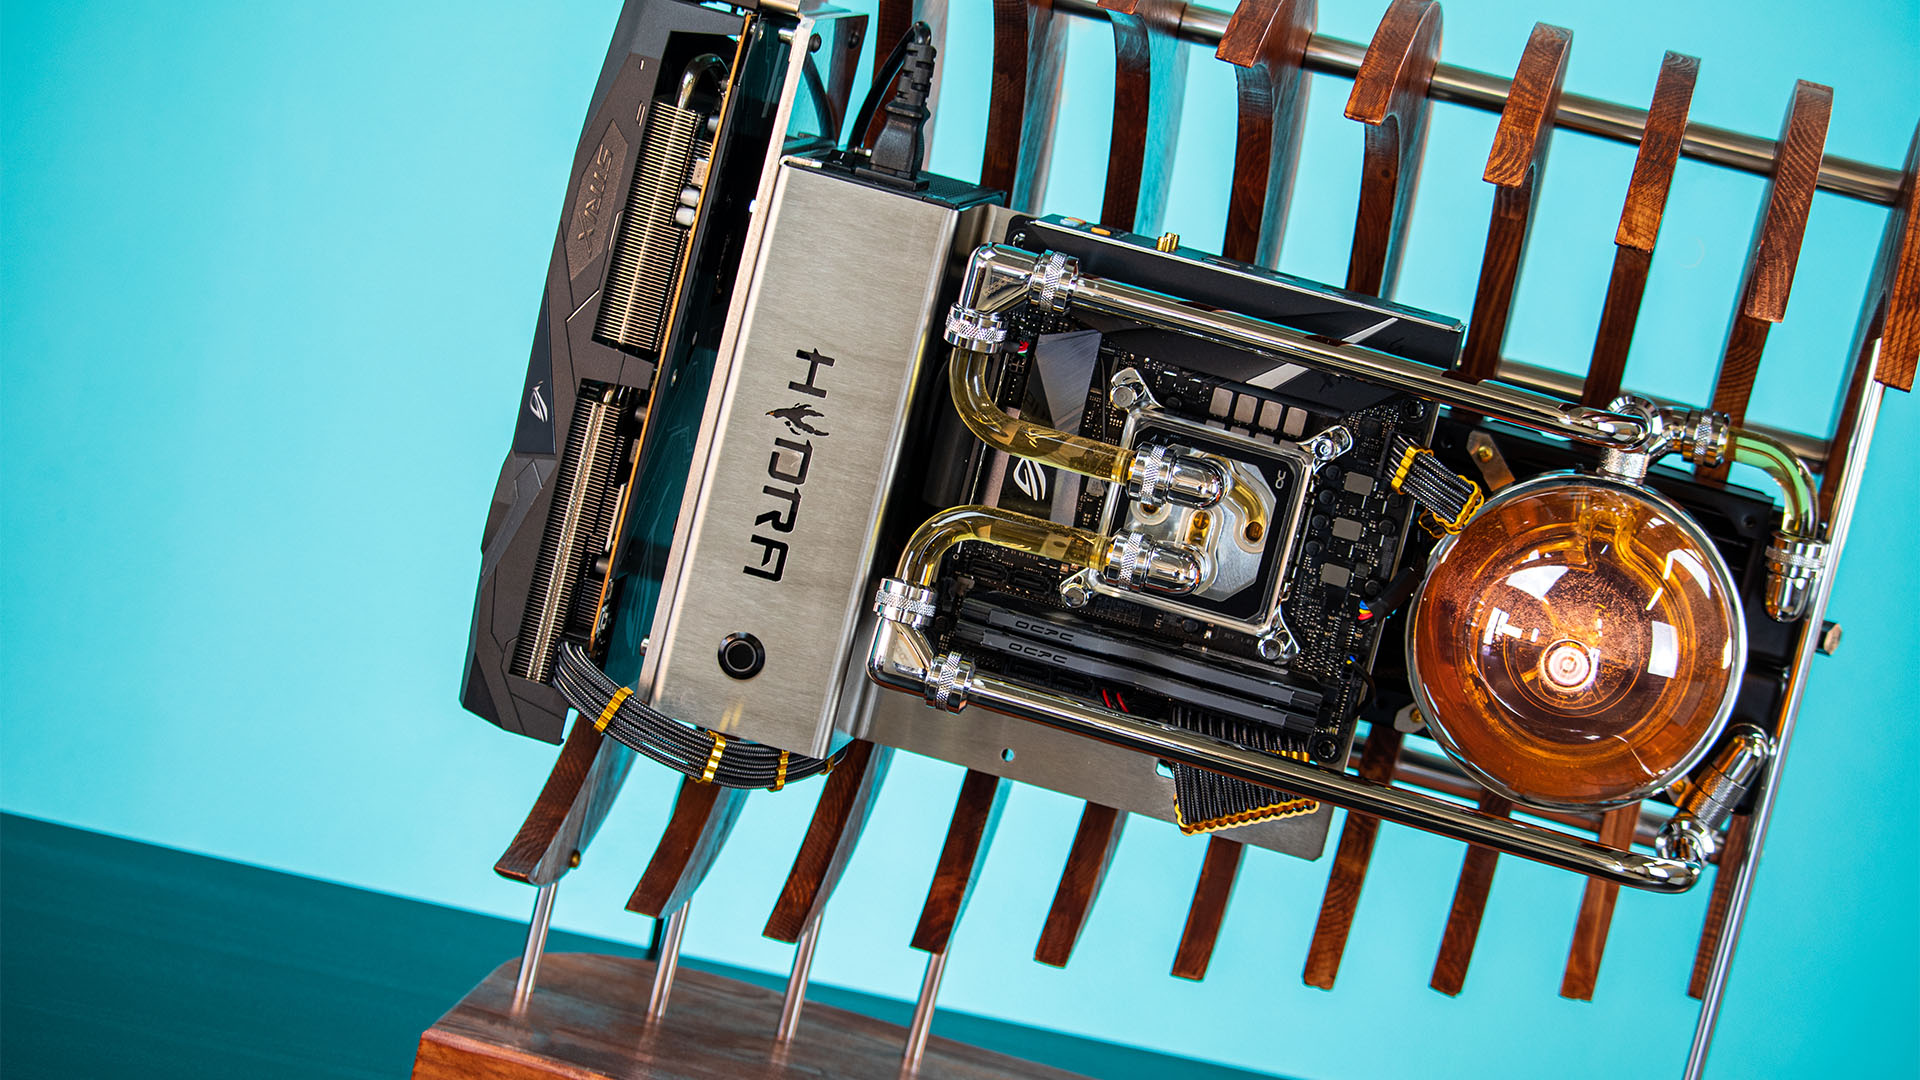
Although some people might be puzzled by the use of such relatively low-end components on a PC that has had such care and attention placed on its design, I’m happy to say that ONDA has standard mountings for graphics cards (up to 29.5cm in length) and mini-ITX motherboards, so the main hardware can be easily upgraded later.
This ability to swap hardware isn’t as obvious as it sounds, as a lot of extremely customized builds often have non-standard mountings for the hardware – sometimes it’s just easier to design and make a part rather than work around standard mounts.
The downside is it makes them very hard to upgrade without making new custom plates and brackets. This is a problem I’ve encountered before with almost all of my projects, but with ONDA and future projects, I decided to put in the extra effort to make everything as upgradable as possible, so that the projects are easier to sell and I’m not bound to the poor specs I originally use for their design.
Wooden waves
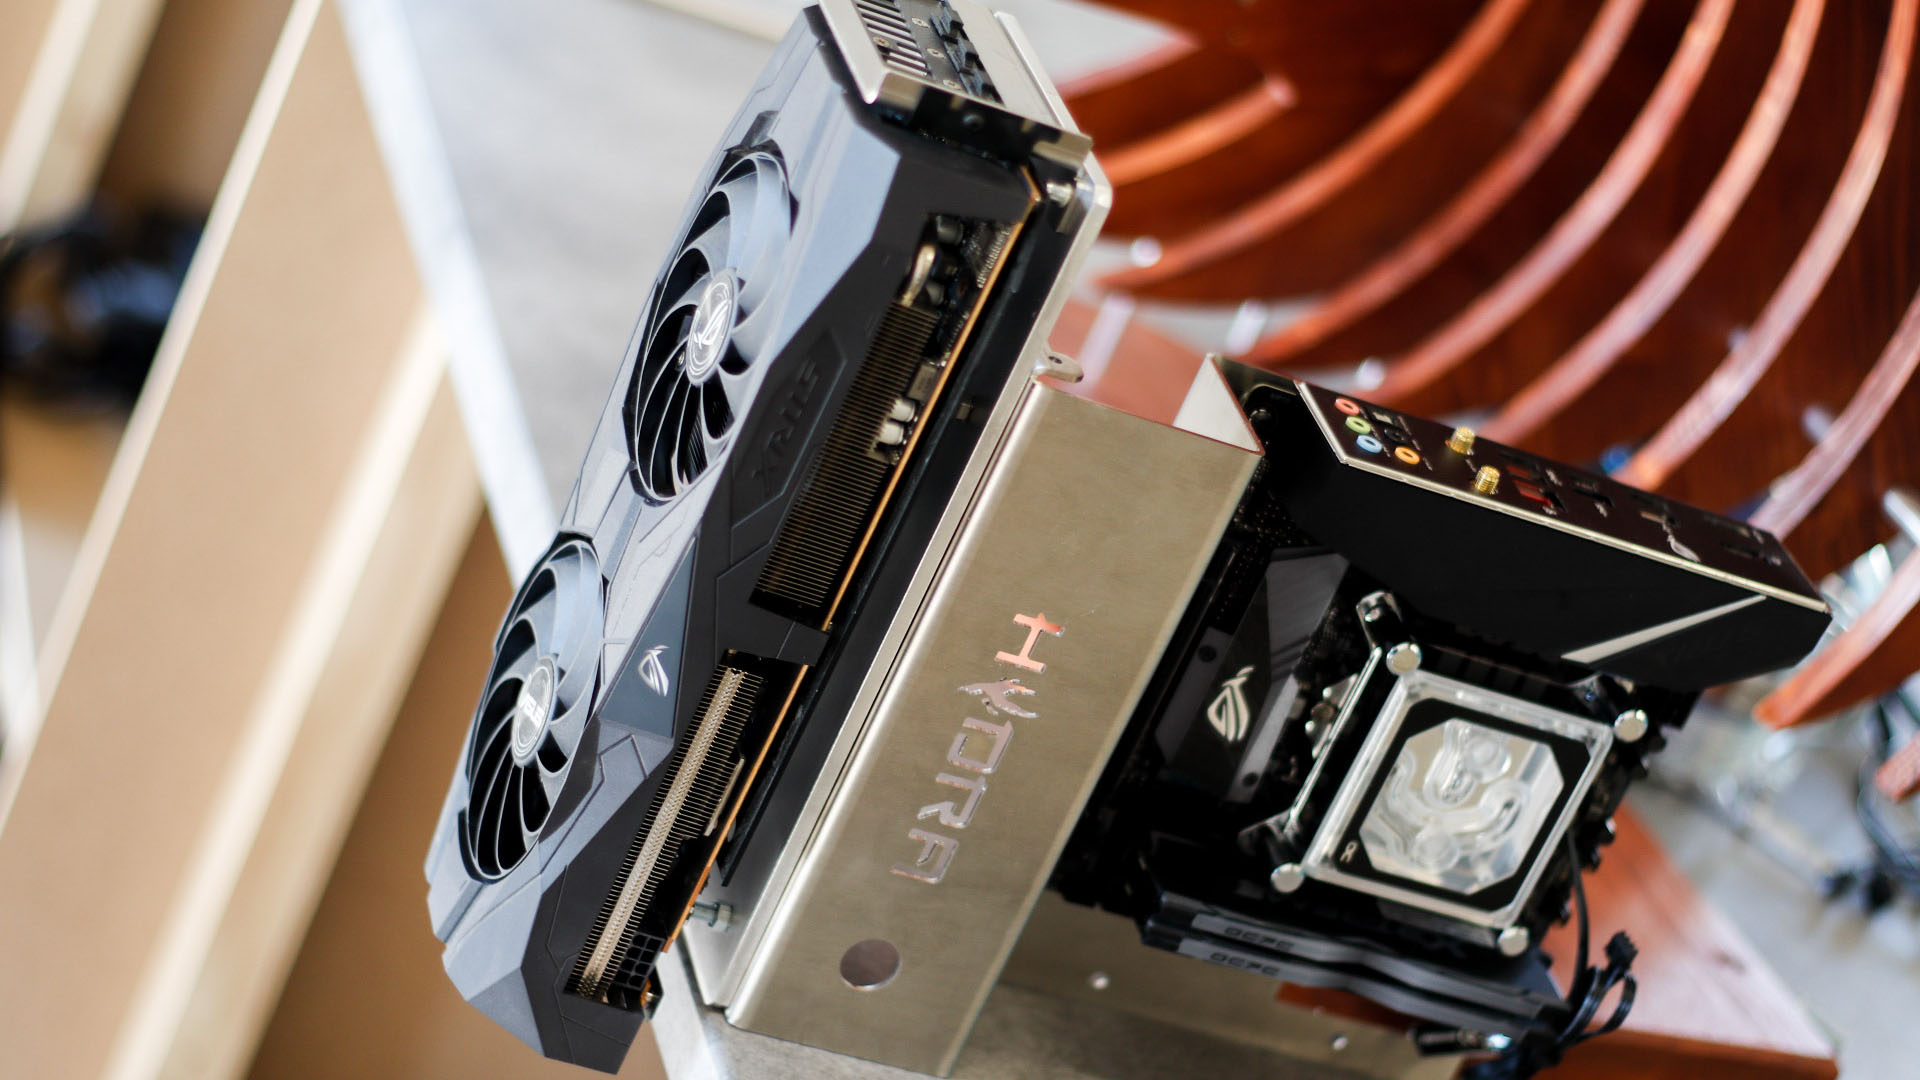
Stepping away from specs talk, we can get started on how ONDA was actually made. Although technically it’s a case mod, since there’s a Hydra Mini case integrated into it, this is essentially a scratch-built PC, as the Mini is really just a mounting plate for the core hardware, with the entire rest of the PC needing to be built around it.
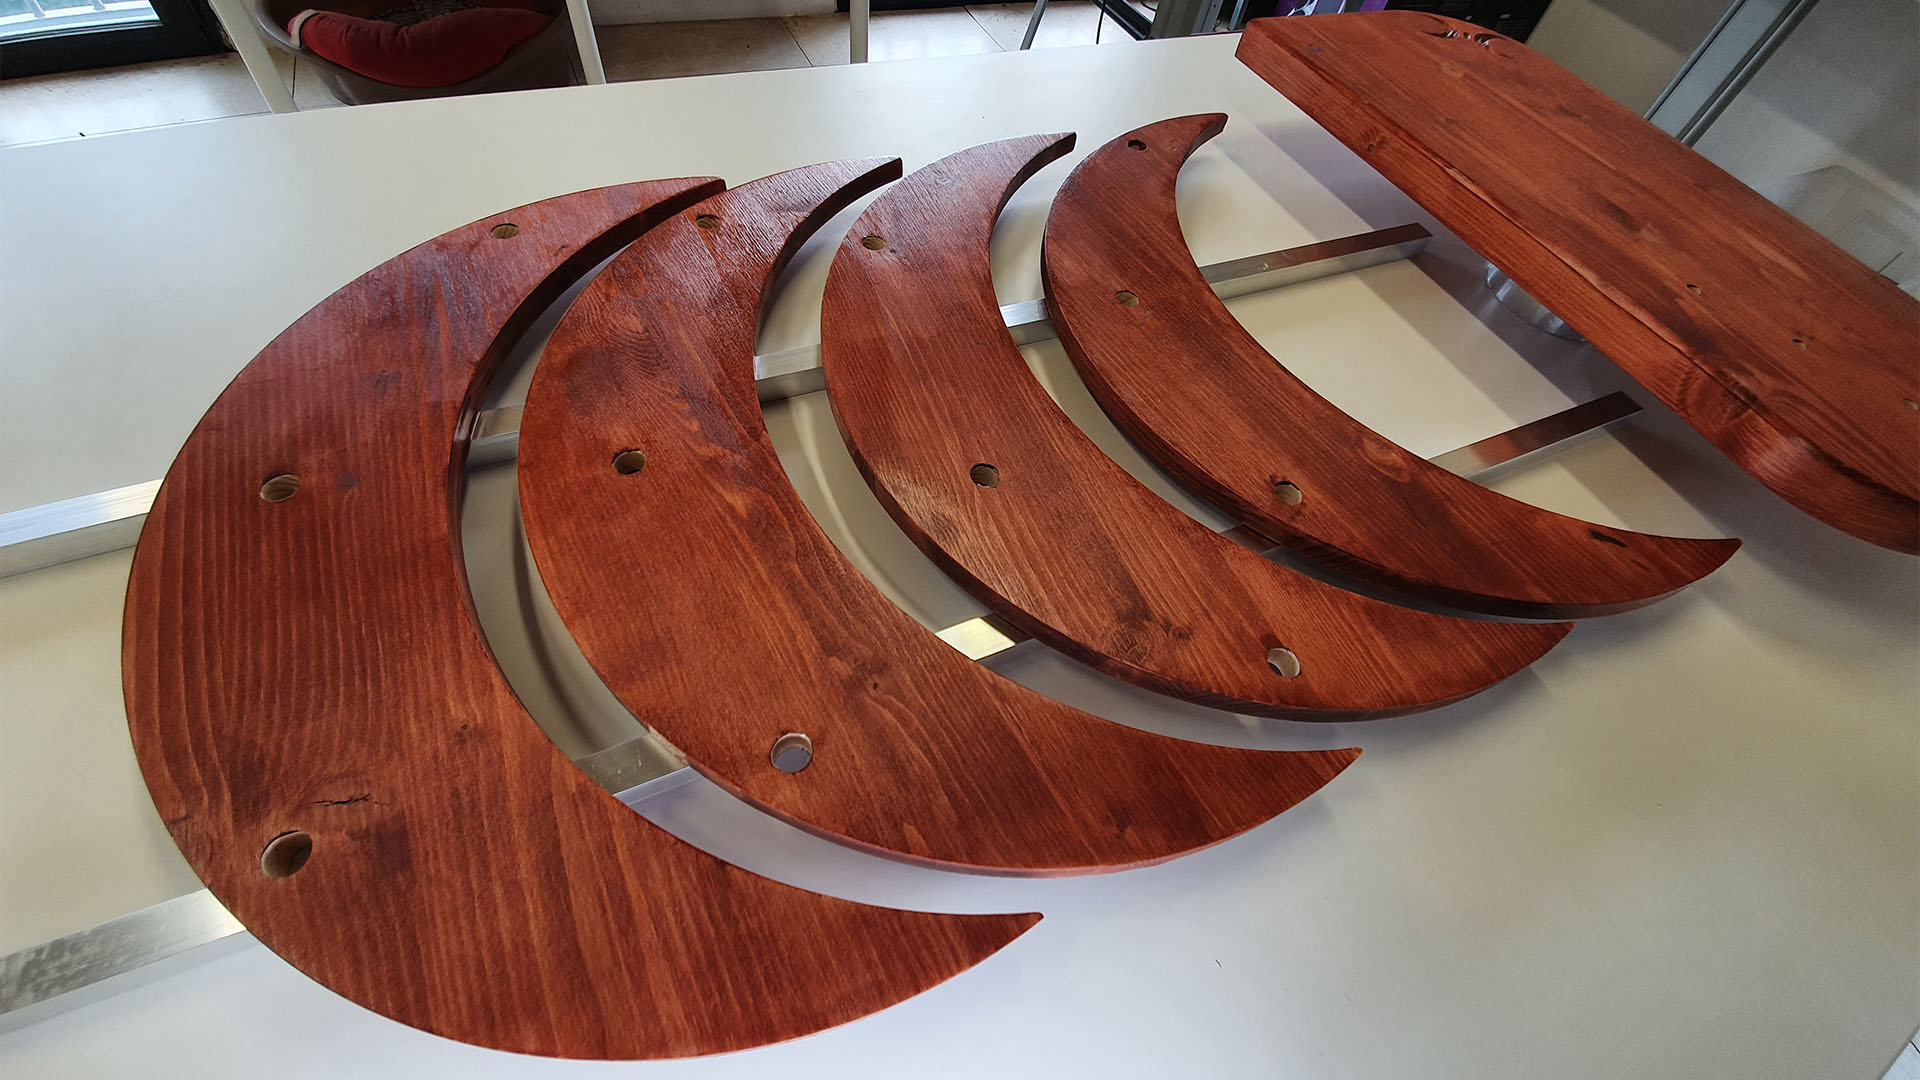
The first thing to do was finalize the 3D design files of each wooden crescent, as they all have different hole positions, so they can be mounted in an offset pattern to create the wave effect.
I used fir wood for making the crescents and instantly regretted it, as it’s a very dry and fragile wood. If I could go back and choose another type of wood, I would at least go for a higher grade of pine, given that I was on a budget. If money were no object, it would have been ideal to use a type of hard wood such as cherry, maple or walnut.
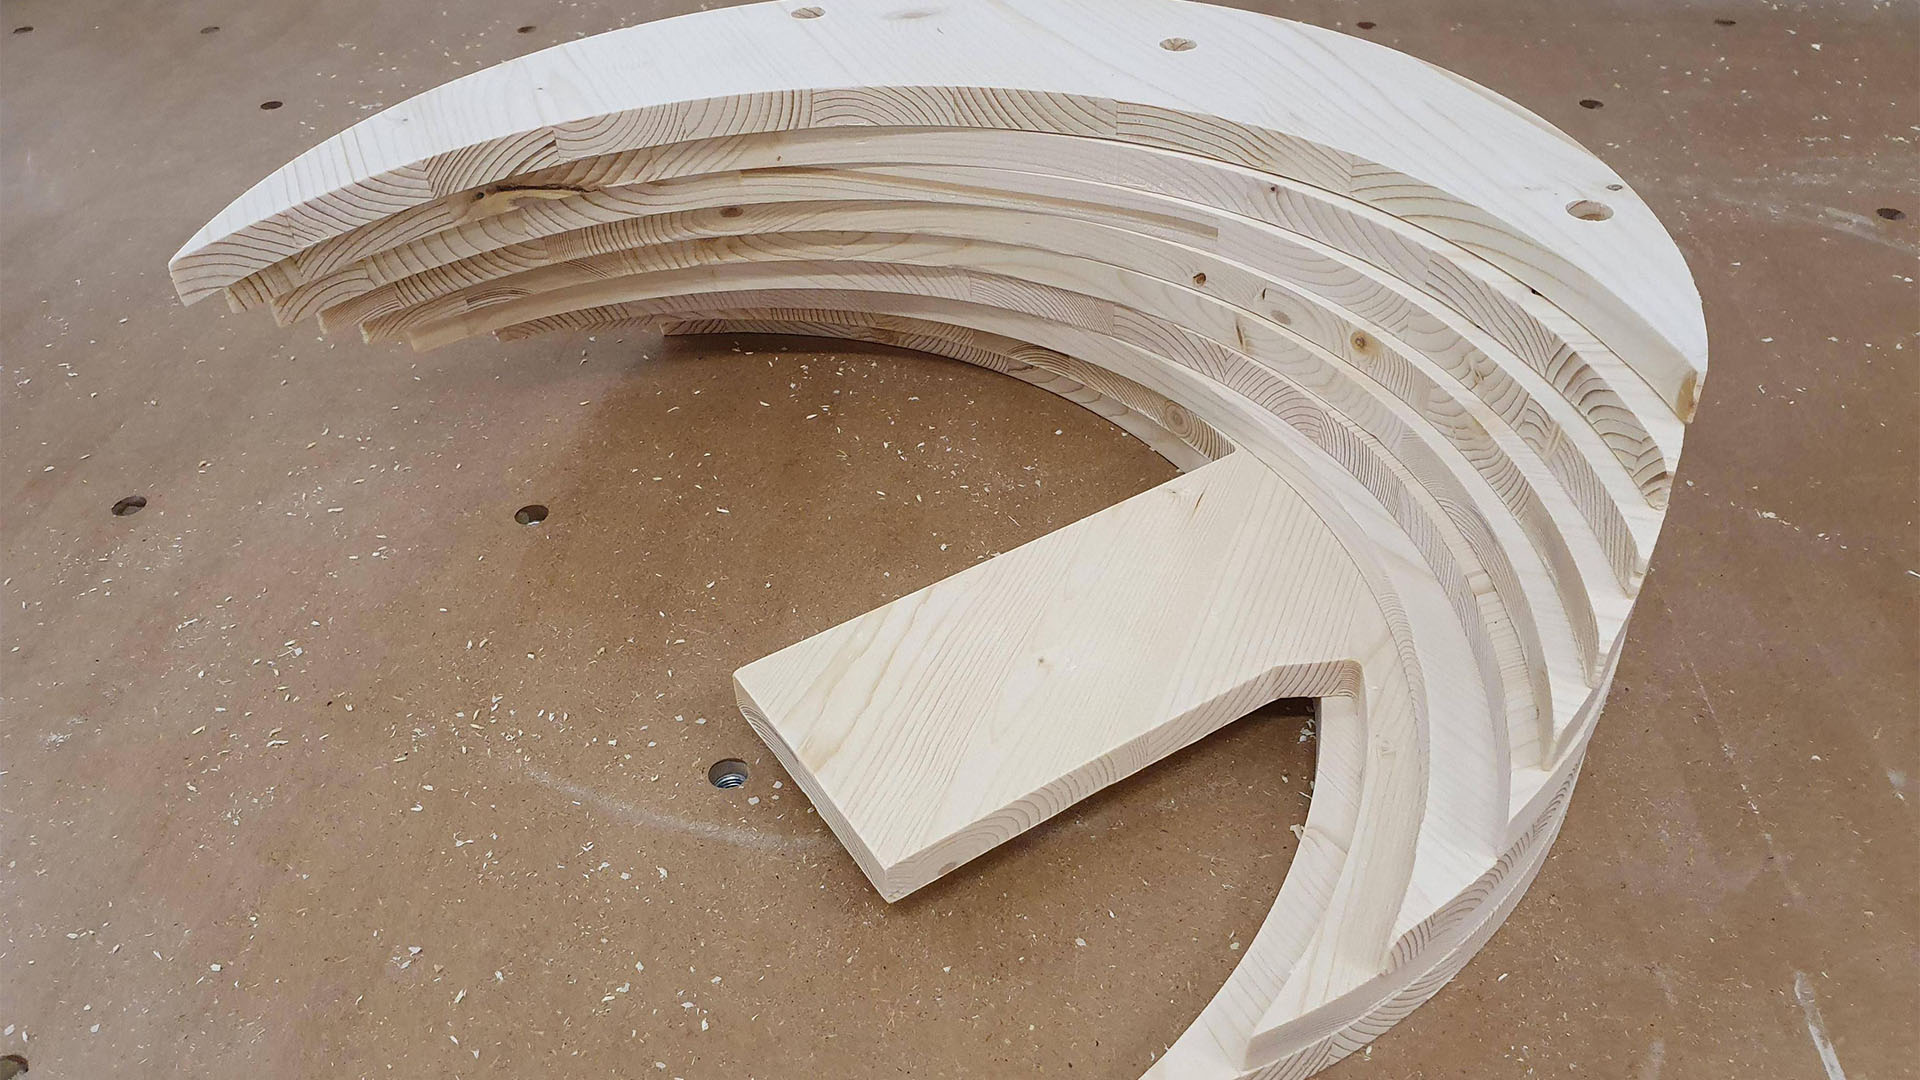
At least it was a cheap way to practice CNC machining and I didn’t have much of a hard time getting these parts done. The same wood was used for the pedestal, only in a 27mm thickness instead of the 14mm thickness I used for the crescents.
The two most tedious aspects of making ONDA were the way the crescents were fixed together and evenly spaced, as well as how the structure was attached to the pedestal using the rods. For mounting the crescents together, I used three aluminum rods with threaded holes at the ends.
Evenly spaced between each crescent is a 36mm section of aluminum tubing, and this was the first real hassle of the build, as I needed 27 sections and I didn’t have a tool that I could use to cut those precisely enough. Neither could I find someone who could do it for me. So I just bought a cheap miter saw that let me achieve a pretty decent result, even though it could be better as far as precision goes.
For suspending the structure in the air, the most difficult aspect was that I had to manually drill 8mm holes on the edges of the first four crescents, so that I could slide in the aluminum rods, and it was pretty difficult to do that precisely enough without damaging the very fragile fir wood.
Once I had done that successfully, I realized it wasn’t nearly as stable as I hoped, so I had to figure out a way to address that issue. The idea of putting an additional long rod below the last crescents was a winning one for improving stability and I think it also added to the aesthetics of the finished product.
To stay on the fir wood dissing train, it also looks very dull, and I wanted a dark and reddish shade to the wood parts, so I gave all the wooden parts two coats of mahogany stain. I was pretty satisfied with the finish, even though a nice dark wood without stain would have clearly been a better option. I’m all about making the best out of cheap stuff when I can, though, so it’s all good.
Hardware headaches
Another difficult phase for ONDA was fixing the radiator and Hydra Mini to the crescents. The problem stemmed largely from my newbie nature at 3D modeling, as I simply couldn’t come up with optimal brackets for both.
I made two aluminum brackets that had to be mounted to the crescents, but I’d cut these in advance, so I had to drill mounting holes manually later on, and let’s just say the shape wasn’t very easy to work with for tracing those measurements. Plus, the poor structural capability of the wood wasn’t helping stability for the Hydra Mini, so I had to adapt the radiator brackets to also be fixed to the case, so that it stayed in place properly.
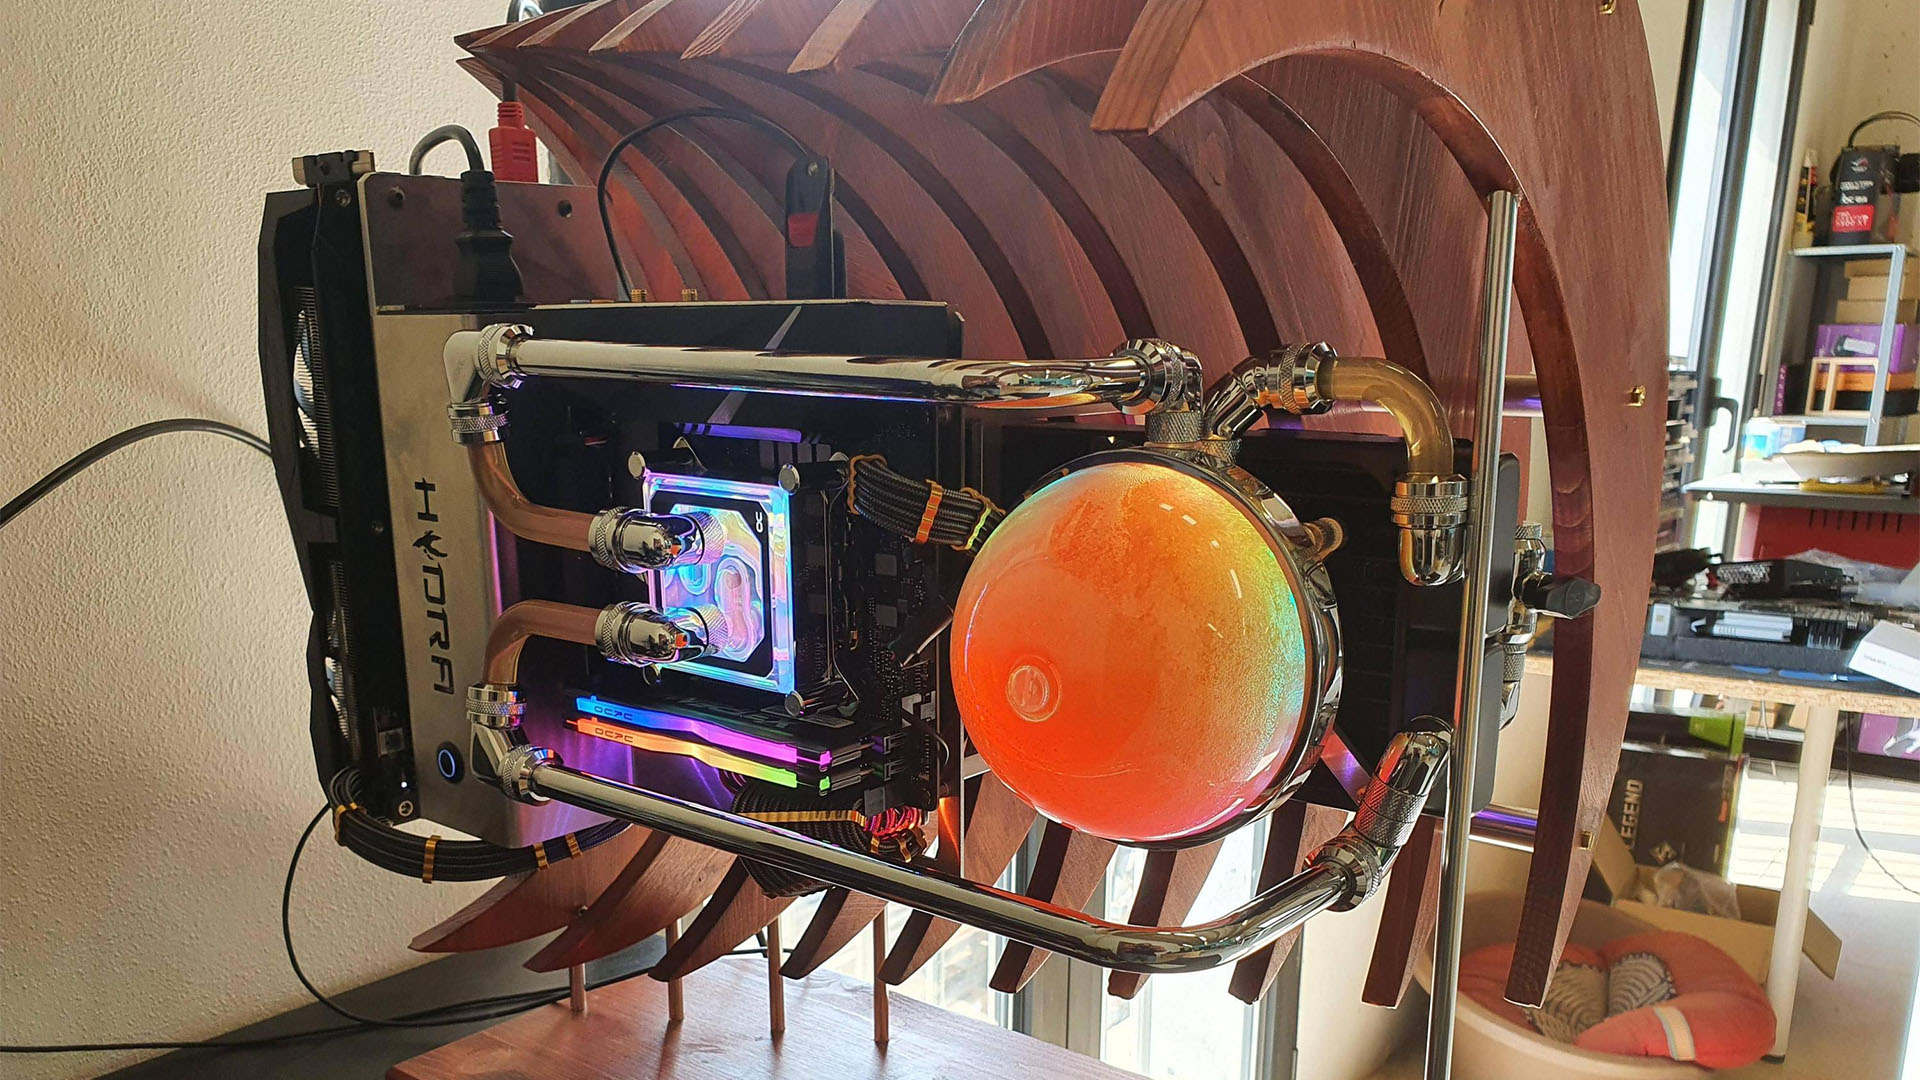
Once I managed to fit all of the main parts together, I had to find a new way to mount the graphics card, as the original mount of the Hydra Mini was no longer serviceable. So I made a custom plate that could be mounted on the bottom of the Mini, then attached to the original graphics card bracket from the case. This moved the graphics card from ‘inside’ the case to the end, where it stands, vertically mounted.
The final key component was the Alphacool Eisball, which sits right in the center of the PC, mounted on the radiator. The original bracket to mount on the radiator just wasn’t cutting it design-wise, so I made a new one from aluminum to fix it to the portion of radiator that was sticking out from behind the Hydra Mini. This way, I was able to fill in the empty space on that side of the case and make for a really neat layout for the hard water-cooling tubing, since every major cooling component was right next to one another.
I’ve always been a fan of parallel hard tubing, but this time I had very little to work with, since there wasn’t much plumbing to do at all, and the graphics card didn’t have a suitable waterblock, so I had to play around with the CPU block piping.
The way I proceeded was by mixing chrome and clear tubing, to provide a nice contrast and fill in the space at the left of the CPU block. This layout also allowed me to satisfy my addiction to parallel tubes, and it made it a very easy process to add the graphics card to the loop in a future upgrade. The chrome tubing was easy to work with, as I used the pre-bent ones from Alphacool.
Once the build was complete, it was time to wrestle with one of my least favorite parts of modding: RGB settings. It’s tedious and never works how it’s supposed to, but it can’t be avoided these days, and I do like that we have the option to set all the lights to the colors we want. In this case, having the full range of RGB colors allowed me to set the lights to that nice warm orange tone that goes well with the shade of the wood and provides a good contrast to the metal parts.
Riding high
Overall, I’m very happy with this project, it was probably my most innovative design to date, and I’ve been modding for around four years now. It was a great success among the community as well, and I was so pleased to see that my work was finally being seen first and foremost as art rather than just a PC mod. ONDA won first place in bit-tech.net’s Mod of the Month and builds.gg’s Build of the Month contests, which makes me very proud.
I’m also now working on an acrylic and stainless steel version for a client and also on a version meant for sale, in limited numbers. All new versions will be stand-alone cases without the Hydra Mini, and will also be built using better materials.
Project ONDA wooden PC specs
- Case: Hydra Mini
- CPU: Intel Core i5-9400F
- Motherboard: Asus ROG Strix B360-I Gaming
- Memory: OCPC Gaming X3treme 16GB 3000MHz
- Graphics card: Asus ROG Strix Radeon RX 5500XT
- PSU: Seasonic Focus SGX-650
- Storage: OCPC Gaming M.2 XT 256GB SSD
- Cooling: Alphacool XPX Aurora Edge CPU waterblock, Alphacool Eisball pump/reservoir
- Sponsors: HWLegend Modding, PC Hunter, Seasonic, Alphacool, OCPC Gaming, CableMod, Hydra
We see a lot of really good PCs, but stunning scratch-builds such as this one always take our breath away – this is astounding work, Alessandro. We love the quality woodwork that’s gone into its construction, and the Eisball reservoir looks amazing on the end. It must have taken you ages.
This post originally appeared on Custom PC, which has been covering amazing setups for over 20 years and is now part of PCGamesN. Join our nearly 500k member Facebook group to discuss this build.
If you consider yourself to be an expert PC builder, you can submit your own custom PC build to us today for a chance of being featured on PCGamesN in the future.
