Armed with a load of EVA foam and plenty of yellow paint, PC modder extraordinaire Dewayne Carel built this SpongeBob SquarePants gaming PC, which was commissioned by Arabian Prince from NWA, who’s apparently a big SpongeBob fan.
Thanks to our rapidly growing PC building Facebook page, we’ve seen many custom gaming PCs, from mods based on existing case designs to scratch PC builds. You can even submit yours for consideration right here. Here we chat to Dewayne about how he built this PC.
PCGamesN: How did this SpongeBob project come about?
It was EVGA that wanted this project – the company wanted to do something special for one of its partners, Arabian Prince from the rap group NWA, who is a huge SpongeBob fan. He even showed up to the unveiling of the case mod –not knowing what it was about or that it was for him – in SpongeBob shoes, pants, and shirt.
How did you plan and design this build?
I looked at tonnes of images on the internet of SpongeBob, and it became apparent that the EVGA DG-77 case I’d been given and SpongeBob were basically the same shape. Some would say ‘Now that is good luck!’ Maybe, but I knew I had to create a case mod where people’s reactions wouldn’t be: ‘All you had to do was paint a case yellow’– yes, you know who you are. I needed to go to the next level to create a PC that didn’t look like it was a weekend project.
Once again, I headed off to the Internet in search of some inspirational images of SpongeBob. I was, of course, able to find an endless supply of images. This was great to get the colours and details needed – close-ups of his eyes, mouth, nose, shoes, and yes, his pants.
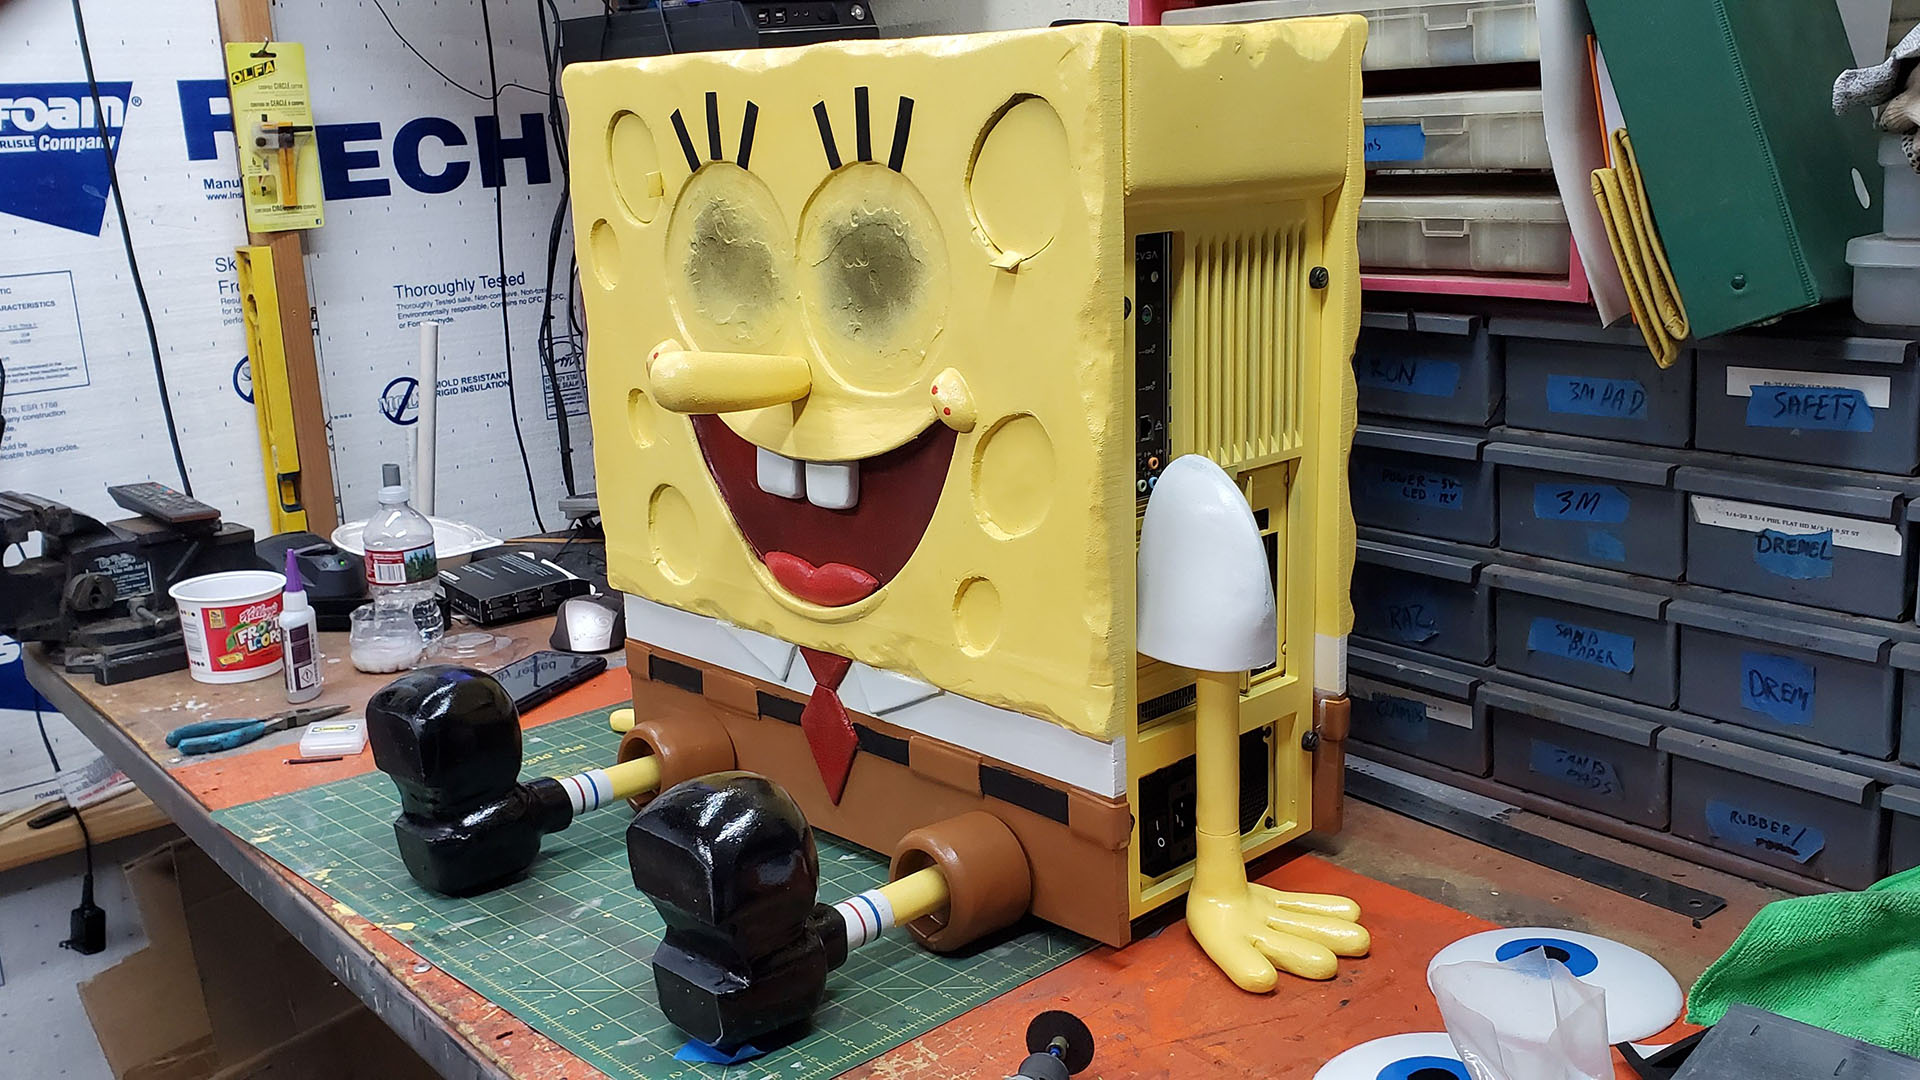
However, in most of the images, he was either standing or running, and I knew this wouldn’t work – how would I balance a fully loaded PC on toothpick legs without some sort of support? Then it hit me – he could be sitting down with his legs sticking straight out.
With that vision in my mind, I quickly worked out the design with pencil and paper, which is my normal way of visualizing my ideas. This plan was perfect – his feet would extend out and his arms would be to his side with his hands flat, making it look like he was sitting and holding himself up.
The face of SpongeBob was the make-or-break feature of the whole build. If it didn’t look like him then I might as well just scrap the whole case mod and save myself from the modding community’s comments. I spent many hours on the design – working out how big to make his eyes, for example, as well as the size of his mouth and how it curves – his smile is a main recognizable feature, and the bottom and top of his mouth protrudes out to form lips. I had to get his nose right too.
You needed to ship this PC to your customer after you’d finished it. How did this affect the build process?
The SpongeBob mod had to be able to be shipped, which meant it had to fit into some sort of box or case. That wasn’t going to be easy with two legs and large shoes sticking out from his body by around 12in, his arms on each side and, most importantly, his nose, which was going to be at least 3.5-4in long and right in the middle of one side of the case mod.
You needed to be able to reattach these parts to the case in the right spots, they needed to be secure and, most importantly, they had to still look like part of the overall design. Looking around my modding shop, I spotted some 0.25in-diameter magnets, which I’d used before.
I thought I could embed the small magnets into the EVA foam I’d used on the case (more on that later), and then glue a small/thin piece of metal to the flat parts of the legs, arms and nose, which would match up to where the magnets were placed.
How did you make that case look like SpongeBob’s head?
I wanted to make sure that SpongeBob looked like he’d walked out of the show and then sat down on a desk. It had to look real, with recessed holes and notches, as well as sponge-like feel. I needed to create that sponge look and effect, but the machine also had to be able to withstand being shipped, moved around, and taken apart for maintenance and future upgrades.
Before this case mod, I had been watching people making Cosplay props and outfits, and thought it would be something fun to do, as I enjoy creating stuff. That’s when it hit me that I could use the same EVA foam they used for this project. This foam is rugged and dense, and it’s also easy to carve and shape into any shape you want. After some measurements and brainstorming, I ordered some different thicknesses and sizes of EVA foam.
The larger pieces of EVA foam were for the actual body of SpongeBob – they’re glued to all the side panels and the front of the case. The EVA foam was 0.5in thick, and I figured I could double up the foam to give me the two different levels of depth that I needed for the transition from SpongeBob’s body to his pants, and that I could carve holes and sculpt the edges to create the sponge effects.
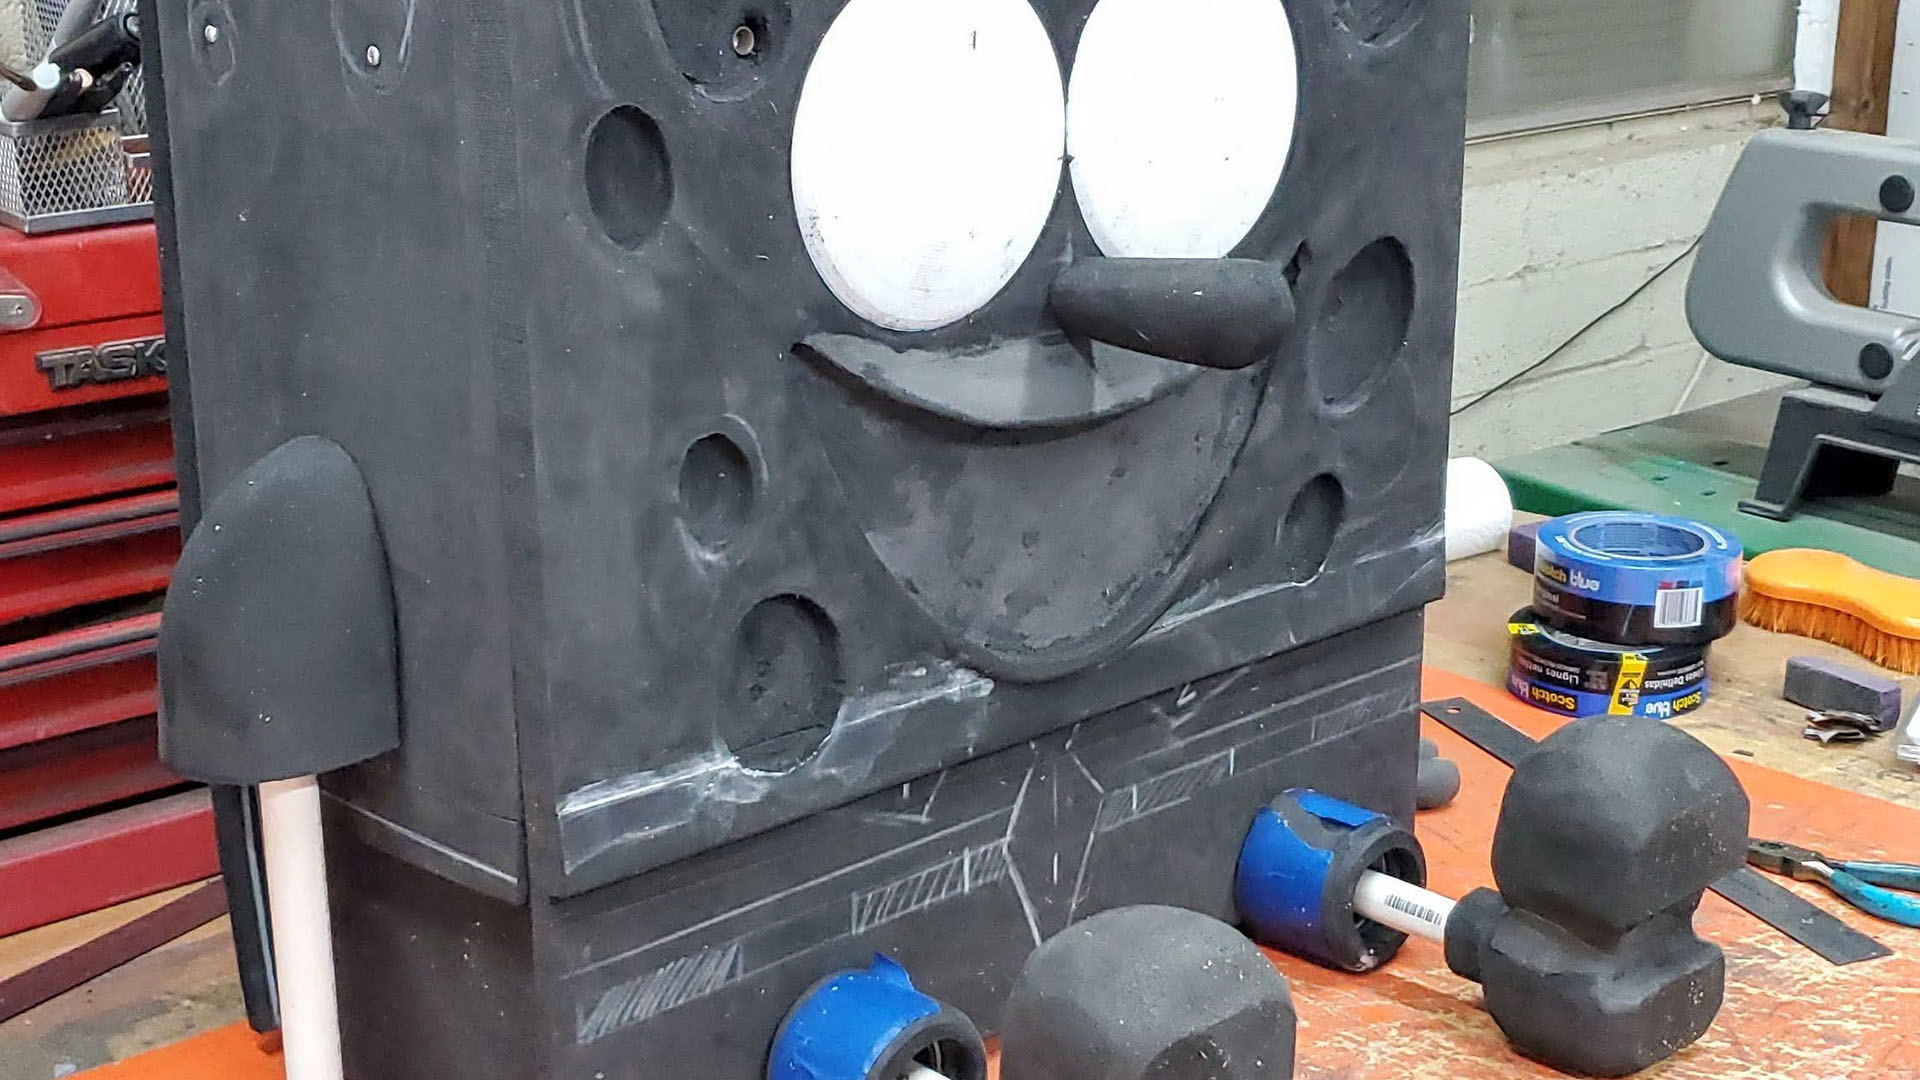
After getting all the foam attached to the case with some heavy-duty spray glue, I made sure that it looked fairly seamless, so that it looked like one huge piece of foam. I then had to work on the design of his eyes, nose, mouth, arms, hands, legs and shoes to make sure that they were in proportion to his body. Using a pencil, paper and a grease pencil I drew directly onto the EVA foam. After many revisions and adjustments, I found a look that I liked.
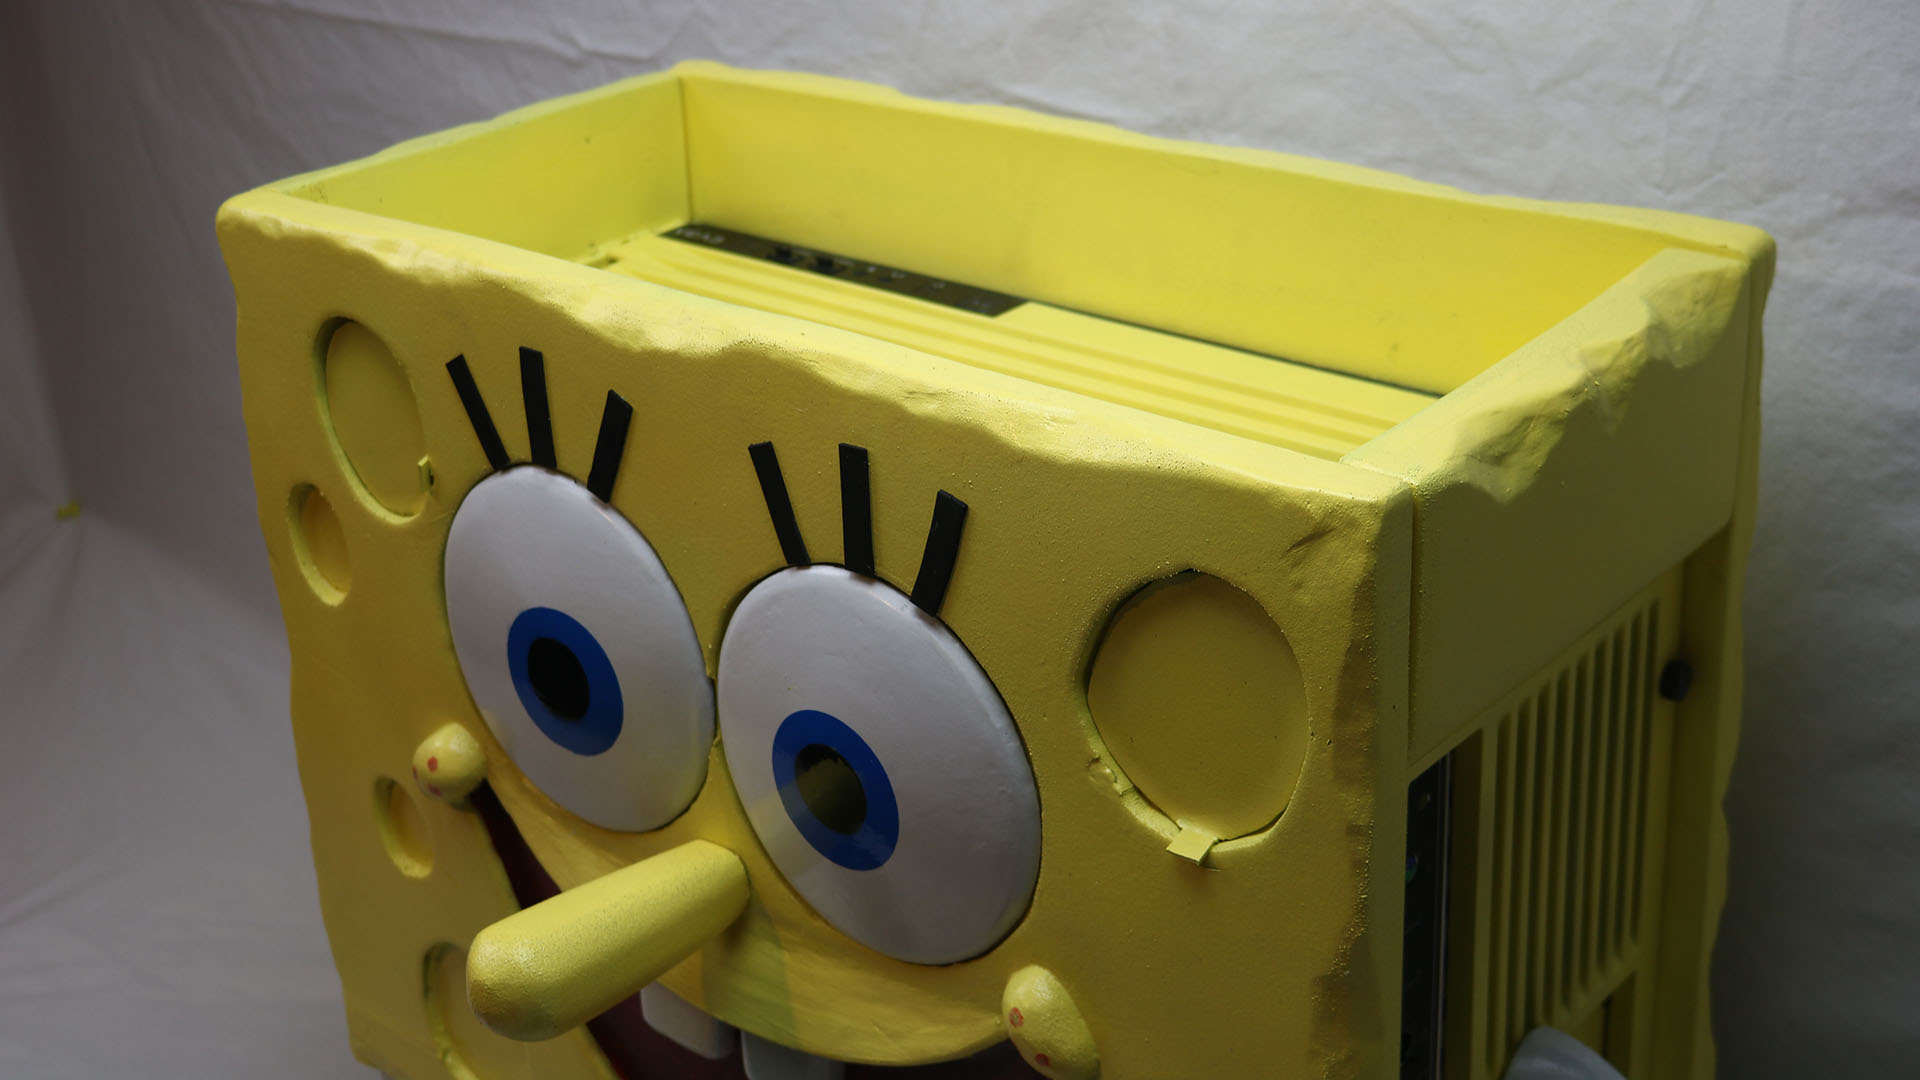
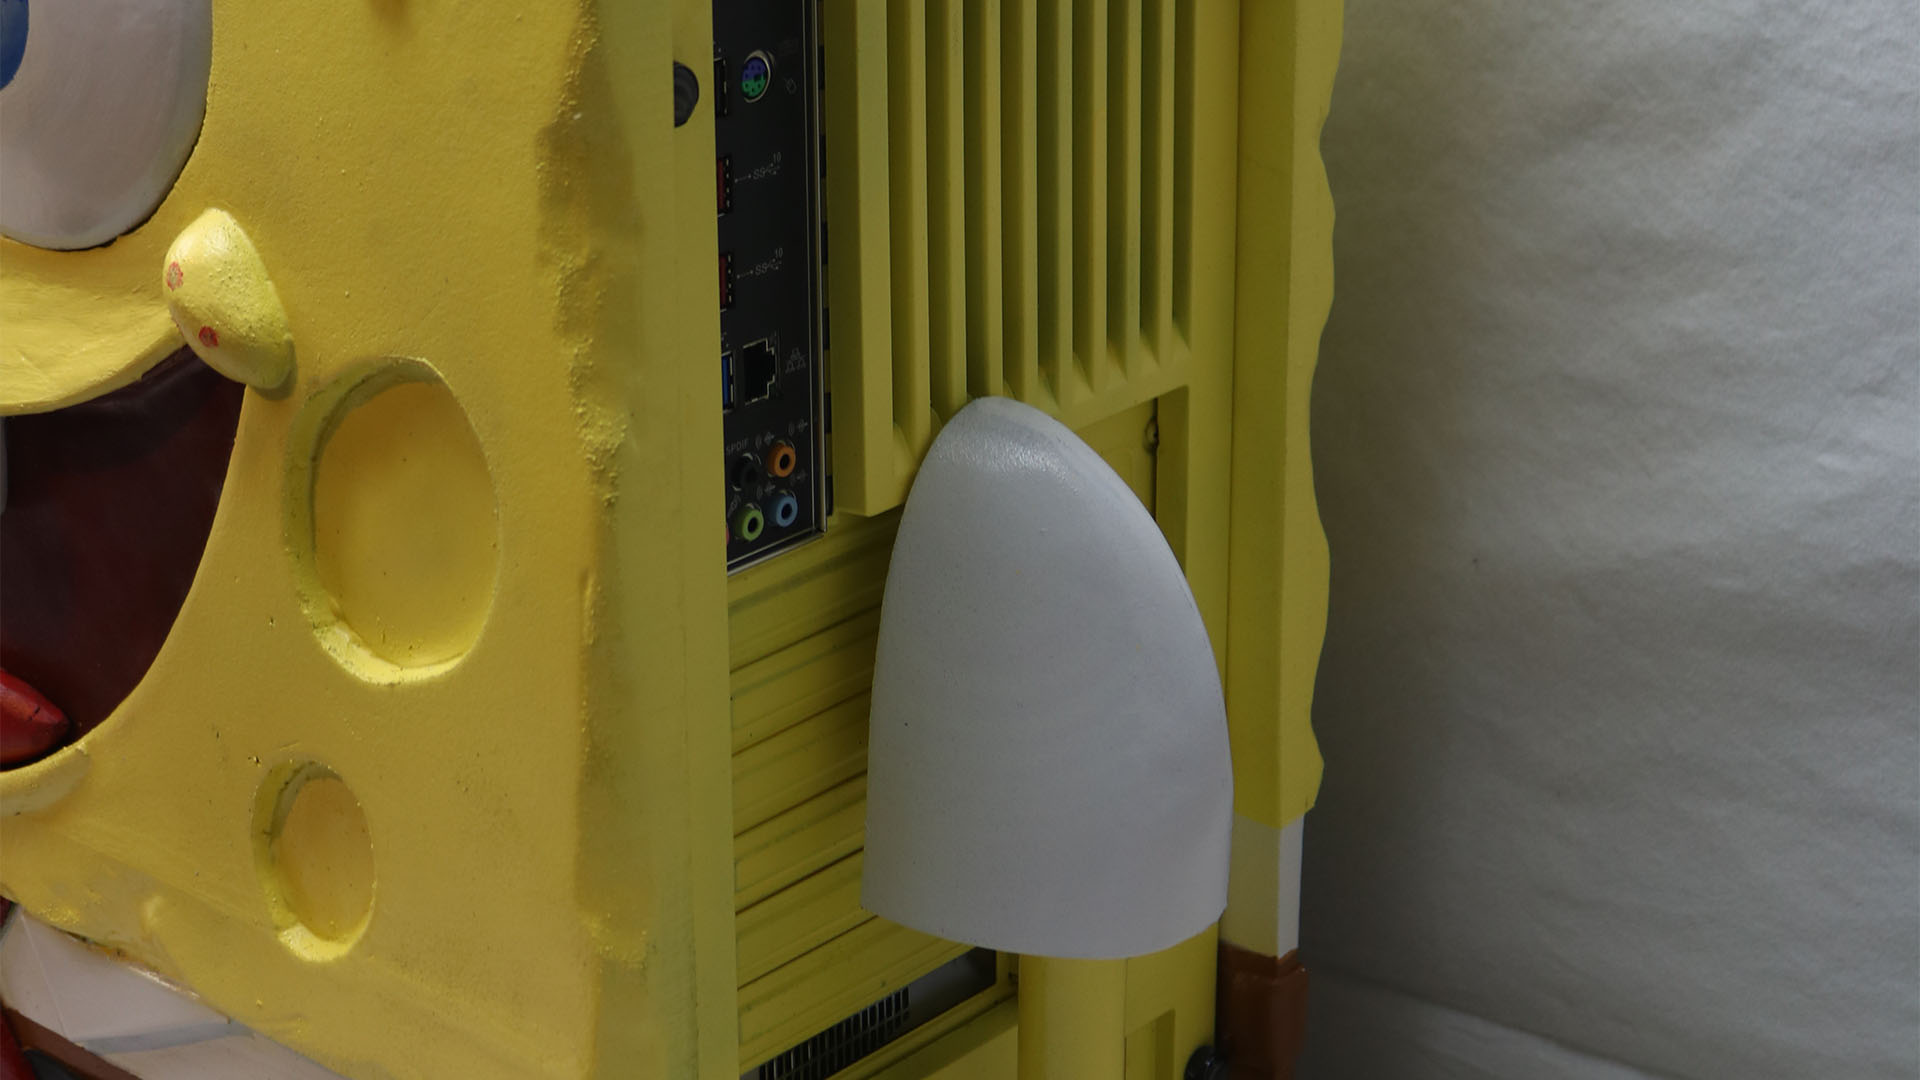
The side panels for this case were held on by thumbscrews that went through the panels themselves. I didn’t want any screws to be visible, as they would ruin the look, so I made sure the carved holes in the ‘sponge’ would be located where the screws went through the panels. I carved out the holes in different shapes to make sure they looked like random holes in the sponge.
To cover the screws, I cut some thin sheet metal into the shapes of the holes around the screws. I then glued EVA foam over them, and left a small tab that could be used to pull off the concealment covers. I then embedded some small magnets into the thick foam and the removable concealment covers for the screws.
How did you go about making the arms, legs, and shoes?
SpongeBob wears some pretty big, old-style shoes with a very distinctive look. There’s a huge, rounded end at the front of the shoe, and a very small, narrow part for his legs. How in the heck was I going to make these without them weighing too much?
I searched on the Internet and found a yoga block that was made from, you guessed it, EVA foam – when I cut it in half, it was the perfect size for carving out two shoes. It took a couple of hours for the first shoe to come to life from the block foam, but it looked great, so I hammered out the second one in less time.
In the images I’d seen online, it appeared that SpongeBob’s arms and legs were the same diameter. After a quick rummage through some leftover modding supplies, I found a section of 0.75in PVC pipe, which was exactly the correct diameter to be in proportion to the overall design. I figured out the lengths I needed for the legs and arms and continued with the build.
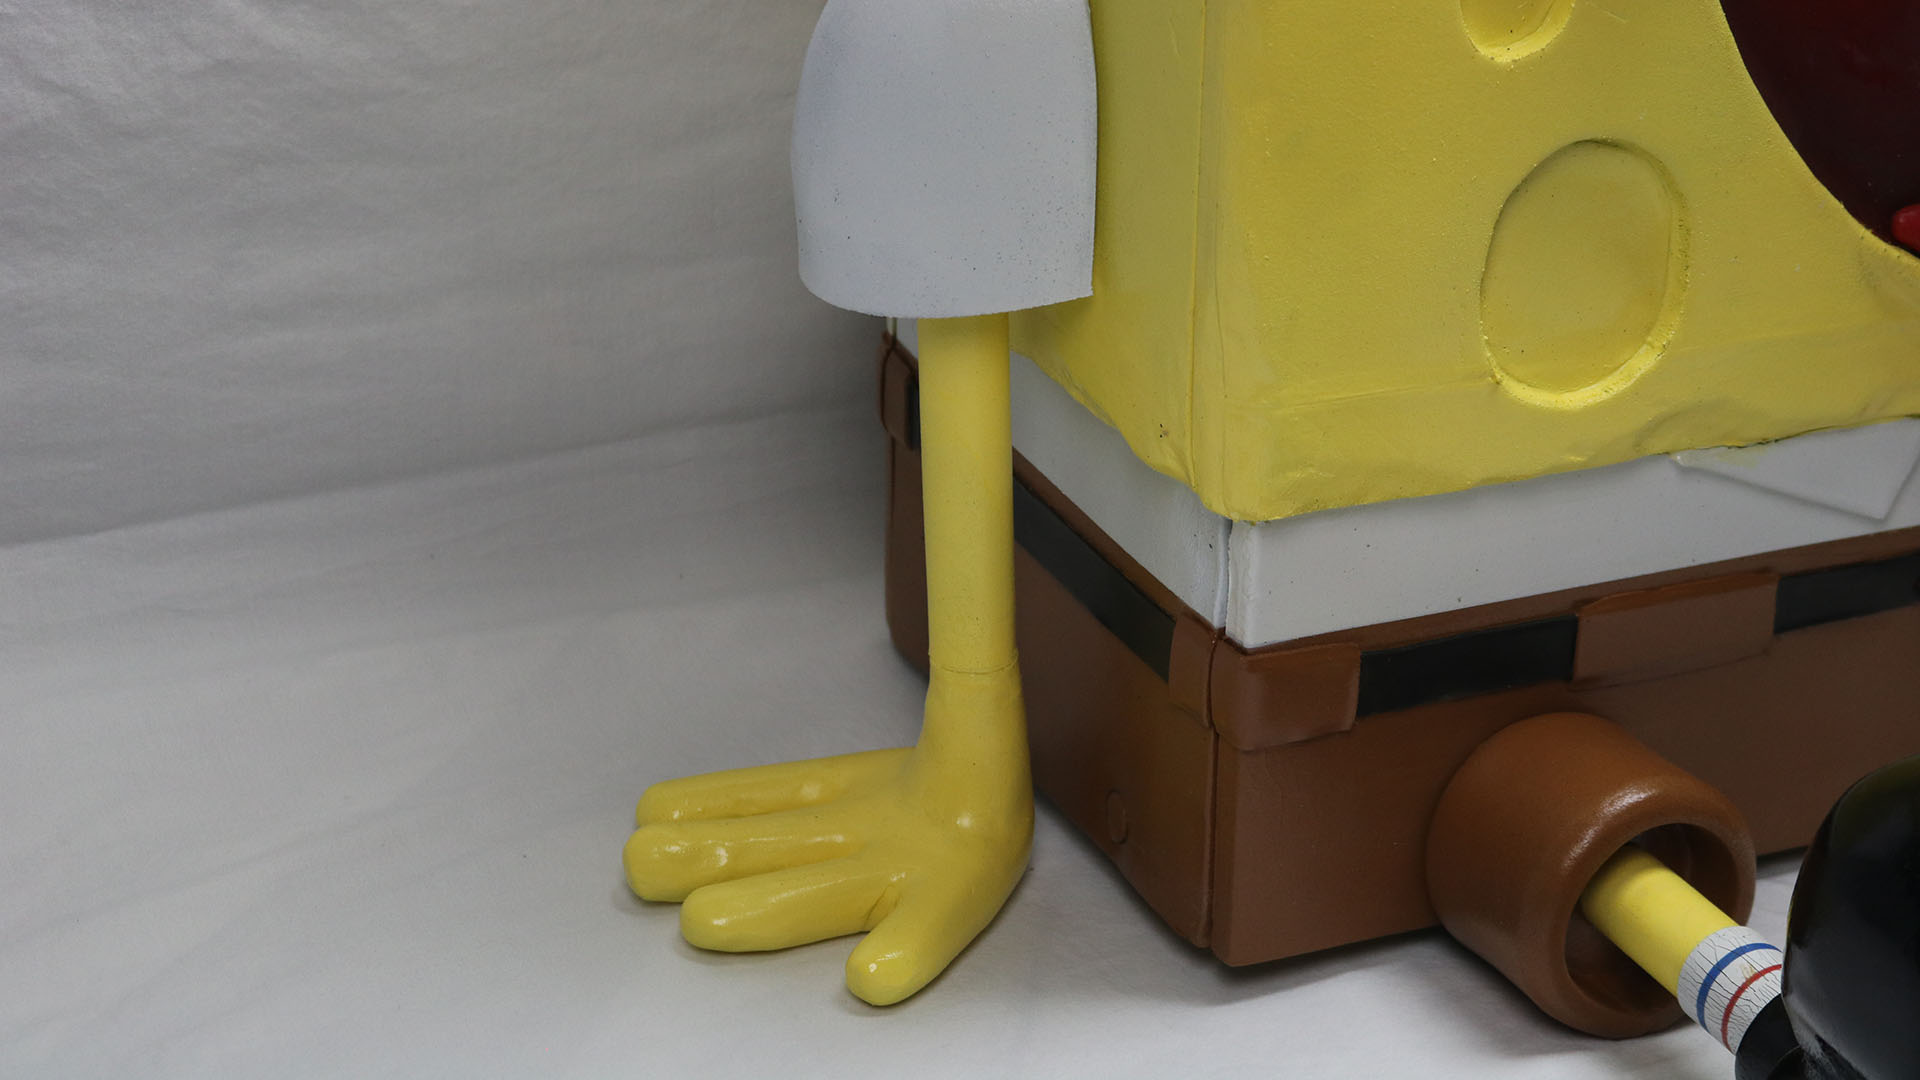
To finish off his legs, I needed to make the ‘pants’ part that would come off his body and attach to his PVC pipe legs. I cut some strips of EVA foam, rolled them, glued them and put an end piece on both sides – one to attach to the case via the magnet setup, and one for his leg to go through. I then made a hole in the top of one of the shoes, inserted the leg piece and SpongeBob now had at least one completed leg.
Switching over to the arms, I figured I would use the same ideas and materials as the legs. However, I didn’t want to try to carve the hands out of EVA blocks.
I first thought I could create them out of clay, but I soon tossed out that idea, as it would be rather heavy and easy to break. I wanted a material that would give me the same texture and look as the rest of the SpongeBob’s body.
I checked to see if there was a ‘clay-like’ material like EVA foam, and there was! I knew this foam would need some sort of support inside it, so I designed and 3D-printed a bone-like skeleton around which I could mold the clay.
How did you create the little details, such as SpongeBob’s eyes and nose?
For SpongeBob’s face, I attached some long skinny strips of EVA foam to make the raised portions of his mouth, and then used some of the clay foam to fill in the rest of the shape.
I then proceeded to sand down and shape it to the final look. Meanwhile, his eyes had to be large, slightly rounded and smooth. I know I couldn’t get the right look with the foam, so I designed them in SketchUp and 3D-printed them. I then applied a thin layer of Bondo on them and sanded it to a smooth finish.
Then there’s the nose, which you might think was easy – it’s kind of round and a few inches long. But again, it’s a very distinctive feature that had to be right to make his face look perfect. I probably spent as much time getting the nose to look right as I spent carving out both shoes.
Once I got the appearance I wanted, it was time to see if a single magnet would hold the nose in place without it falling off. I placed one magnet into the foam on the case and attached a small piece of sheet metal to the flat part of the base of the nose – it worked perfectly.
What paints did you use to get those striking colors?
A huge mountain to climb was getting the right color of yellow. If the yellow was too light, SpongeBob would look washed out and pale. If it was too dark, he would look like he was living in a cave instead of a pineapple.
I went to a couple of my local hardware stores and, like a miracle, I found a yellow color that I thought would be perfect, so I bought one can. After doing a few test sprays, I determined that it was the perfect color of yellow for SpongeBob, so I went back to the hardware store for a few more cans.
With the right shade of yellow in hand, I painted the entire case inside and out with the yellow paint. This was done so that any exposed parts of the case weren’t covered with the foam would match, and give it a seamless look. SpongeBob’s clothes were just basic red, white, brown and black colors, thank goodness.
How does the airflow system work with all that solid material surrounding the case?
That was the same question I asked myself throughout the build process. I knew that adding about an inch of foam to the outside of the case would defeat the conduction process that normally happens with a case. I first made sure that any of the original airflow design was kept intact as much as possible and worked around it.
Any hidden areas with air intakes, such as the bottom of the case and bottom of the front bezel, got special treatment – I enlarged existing holes and added more holes in order to increase the airflow. I was quite pleased with my stress testing, as it showed the temperatures were only a few degrees above those of a stock setup.
How long did it take you to complete this build, from start to finish?
The actual build time was around 80 hours or more, but the time dedicated to the design, learning how to work with unfamiliar materials and so on went way past 120 hours.
Are you completely happy with the end result, or do you wish you’d done some of it differently in retrospect?
I will admit that I was surprised that it came out as well as it did! All through the build, I was hoping that it would all come together and not look terrible. The end result really impressed me when I was done.
SpongeBob SquarePants PC specs
- CPU: Intel Core i7-9700K
- GPU: EVGA GeForce RTX 2080 Ti XC Ultra
- Case: EVGA DG-77
- Storage: Intel Optane SSD 9
- Memory: 16GB Viper 3200MHz DDR4
- Motherboard: EVGA Z390 FTW
- PSU: 800W EVGA
- Cooling: EVGA 280mm AIO liquid cooler
This is some brilliant modeling work, Dewayne – you can almost believe he’d be able to play a little tune with his nose! The fact that you’ve made a PC look like SpongeBob is already a cracking achievement, but the fact that it was bought by one of the guys from NWA is just the icing on the cake – amazing.
This post originally appeared on Custom PC, which has been covering amazing setups for over 20 years and is now part of PCGamesN. Join our nearly 500k member Facebook group to discuss this build.
If you consider yourself to be an expert PC builder, you can submit your own custom PC build to us today for a chance of being featured on PCGamesN in the future.
